Wednesday, December 23, 2020

Shoot Like Your Grandpa

This shotgun belonged to my great grandfather Roy Harr. It is a 2-round German Mauser bolt action Geha shotgun in 12ga. Now there's a lot to unpack there, but let me start by tying this back in to one of my previous "Like Your Grandpa" posts. In the first post in the series "Shave Like Your Grandpa" I talked about rituals and how we (mostly men) thrive on them. That was in the context of the shaving ritual, but shooting is not really different. In fact, I would argue that for shooting or handling any dangerous object, a ritual is critically important. Shooting is a rather long and involved ritual, especially with antique weapons like this. When you first lay your hands on a weapon, the first step in the ritual is to check to make sure that it is 'clear' (that is, not loaded). Then you might inspect it to make sure it is clean and in good working order. Once you are in a safe place to fire, you would load the weapon and at this point there are a number of safety "rituals" to follow (keep your finger off the trigger, don't point it at anything you don't want to destroy, etc.). Then there is the ritual of actually aiming, firing and in the case of bolt action firearms, ejecting the spent round and chambering the next. Attention to detail and doing things in the right order are important. So this is the appeal for me. I'm not a hunter. I'm a hobbyist. I shoot paper targets at the shooting range for fun. Part of that fun is getting the ritual right and seeing a good result.

Now about this shotgun... When Germany signed the Treaty of Versailles ending WWI in 1919, they agreed to not produce military arms. They could produce 'sporting arms' though. Now they had a large surplus of Mauser military rifles, so what to do with them? Melting them down seemed like a waste of a resource, so they decided to convert the rifles into shotguns. The shotguns were sold to farmers and hunters under a few different brands, Geha being one. My great grandpa Harr probably bought this new and used it on his farm in Washington state. When it was eventually handed to me by my uncle it hadn't been fired in many decades. I cleaned it and took it to a gunsmith to have it inspected. He said it was good to fire. There are many arguements in the shotgun community as to whether these are actually safe to fire. There are apocryphal and third hand stories of catastrophic failures, but I've yet to read anything that leads me to believe that they are dangerous in any systemic way. Remember these were built to withstand the high pressures of military rifle ammunition and so are "over-built" for the lower pressure of shotgun shells. The shotgun holds 2 rounds. I like to shoot a shell with bird shot followed by one with 00 buck shot. It's fun to feel the difference in the two rounds one right after the other. Of course the bird shot obliterates the paper target, so you can't really see the spread of the buck shot after that, but it's really just about the experience. No one shoots stationary paper targets at the range to improve their accuracy with a shotgun.

  • Camera: Standard Cameras 4x5 1.0
  • Film: Kodak Clinic Select Green x-ray film
  • Developer: DIY Parodinal 1:100 x 4 minutes
  • Fixer: Sodium Thiosufate/Sodium Sulfate basic non-hardening fixer

Saturday, December 5, 2020

Smoke Like Your Grandpa

There are five men that I called Grandpa at one time or another. A few of them smoked cigarettes and one smoked a pipe. I find cigarettes unpalatable and generally offensive to the senses. I have never smoked a complete cigarette. But I remember my grandpa's pipe and the smell of the tobacco. Even as a child, it smelled good to me. I was too young to really know anything about anything but I don't think he smoked the flavored (aromatic) tobacco. He was a farmer and I find it more believable that he smoked a regular 'drug store' brand. So I had been conscious of pipes from a young age. I bought my first pipe when I was 21. That was the legal age to buy tobacco at the time. This was pre-internet, so I really had no idea what I was doing. I bought a Peterson system pipe in a subtley flared 'calabash' shape and I bought some fruity tobacco that smelled great in the jar at the tobacconist. The experience of smoking a pipe was frustrating and after a few attempts, I put it away for a couple of decades. When I decided to come back and try again I had the full resource of the internet and all of the helpful pipe smokers on the Pipe Smokers Forums to advise and encourage me. What I quickly learned was that smoking a pipe is a ritual. See my post on shaving like your grandpa for a brief discussion of rituals in our lives. I quickly lost my hang-ups about being 'good' at pipe smoking and saw it as an excersize in relaxation and contemplation. I left behind the fruity flavors of aromatic tobacco and instead prefered the pungent earthy tones of English blends. I also came to appreciate the simplicity and utility of an inexpensive corn cob pipe. Briar pipes are beautiful works of art (or at least they can be) and I have a few that I enjoy very much. But a corn cob transports me to a simpler time and I find that between the ritual of packing, lighting and smoking, and the feel of the corncob pipe and the flavors and aromas of the tobacco, the experience is truly unique and satisfying. I think our grandfathers knew this as well, but they might have taken it more for granted. I could be wrong, but I think that suburban work-a-day life in the 40's and 50's was perhaps less of a burden than it often is in the 21st century. So when I smoke a pipe I try to savor the feeling of simplicity. There may come a day when tobacco in any form is no longer tolerated. I hope that day will delay for a few more decades until I am removed from this mortal coil and can enjoy a pipe with my grandpa in the next.

Standard Cameras 1.0 4x5
Catlabs XFilm 80 @ 25
My-tol 1:1 x 8.5min

Sunday, November 22, 2020

Dress Like Your Grandpa

The second photo in the series is of a few of my clothing items. Now keep in mind that I am not a 'hipster', nor am I trying intentionally to be an oddball attention seeker by dressing weird. But I do strive to have some style. I think in this age when you can show up at an upscale restaurant in torn jeans, a t-shirt with some snarky slogan and a pair of flip-flops that it shows some dignity and self-respect to dress up a little. In some cases it does bring attention, but in my experience it is invariably positive and complimentary. In fact just today I was complimented 3 times on my bowtie at church. People like it because it says that I think the people I am around are worth a little more effort than just pulling on a sweatshirt. Our grandfathers did this (mine was born in 1922). They wore hats for pragmatic as well as reasons of style. Living in So. Cal. I frequently am thankful for a brimmed hat to keep the sun out of my eyes. I have short hair, so it prevents my head from getting sunburned and when the weather cools off, I appreciate the warmth of some wool covering my cranium. Trilby, bowler, homberg, pork pie, panama, I don't care. Put it on with a bit of a nasty angle and style is yours.

Here is my grandpa on the right with his two sisters and his mom and dad. He looks maybe 17 or 18 in this picture. Look at those hats! Looking sharp Gramps!

My point here is that we don't have to be so casual all the time. It's okay to put on a nice gingham shirt, learn to tie a bowtie, polish up the brogues and top it off with a stylish lid. Make some effort. The people around you will notice and appreciate it and you will feel better in your own skin. You might even see some of your friends start to step up their style game.

The photo was taken with the following:

  • Standard Cameras 4x5 1.0
  • CatLabs XFilm 80 pulled to 25
  • My-Tol 1:1 x 8.5 minutes

Friday, November 6, 2020

Shave Like Your Grandpa

I am starting a series of posts that center around the things that I do that are anachronistic. They belong to a previous time; that of my grandfather. These are not necessarily things he did or used personally, but are of his generation (give or take a generation). The photos will be taken on film, of course, but the posts will only have the minimum of detail around the actual photo. The content is really about the particular thing I am photographing.

I do some things in an 'old fashioned' way because I think that the world of 80 or 100 years ago was less rushed, less frantic, less worried about leaping from one instant gratification to the next. That slower pace and methodical approach to life is very appealing to me these days. Don't get the impression that I am a luddite. I work for a modern software company and spend many hours a week sitting at a computer writing code and emails and whatnot just like many many others. I don't hate technology, but I think it has its place in my life and there are other places where it does not belong. For example, shaving...

Shaving is a ritual. Whether you shave dry wih an electric shaver or use a plastic disposable with a can of shaving gel, you have a process. I think most men today use either an electric shaver or a multi-bladed cartrige with some sort of shaving foam to lubricate their skin. This is a very efficient way to get through the process with as little thought, time, effort and risk as possible. It is still a ritual, just a short one. I used to shave that way, but I was never satisfied with the quality of the shave I got, nor the feeling I had when the 'ritual' was over. I shaved once or maybe twice a week because I dreaded it an a clean shave was not required for my job. I remembered that my dad used a 'safety razor', so I decided to give that a try. A single blade... how was that going to work? As it turns out, it worked pretty well. I learned the 'grain map' of my face and started getting the closest, most comfortable shaves of my life. When I decided to add shaving soap and a brush to the ritual, it became truly enjoyable and an opportunity to 'pamper' myself. The final straw that made me go 'full grandpa' was the decision to get a straight razor and learn to shave that way. Now the ritual has expanded to stropping and occasionally sharpening the blade. My shaving ritual now takes about 35 minutes every other day. I put on some good music and take my time. My world slows waaaay down and I stop thinking about all of the external troubles. This is by choice and by necessity. Putting a razor-sharp blade to your throat requires some care and focus. So that's why I shave like my grandpa.

The first photo is of my safety razor, along with my badger brush and a bowl for lathering the soap.

Shave Like Your Grandpa 1

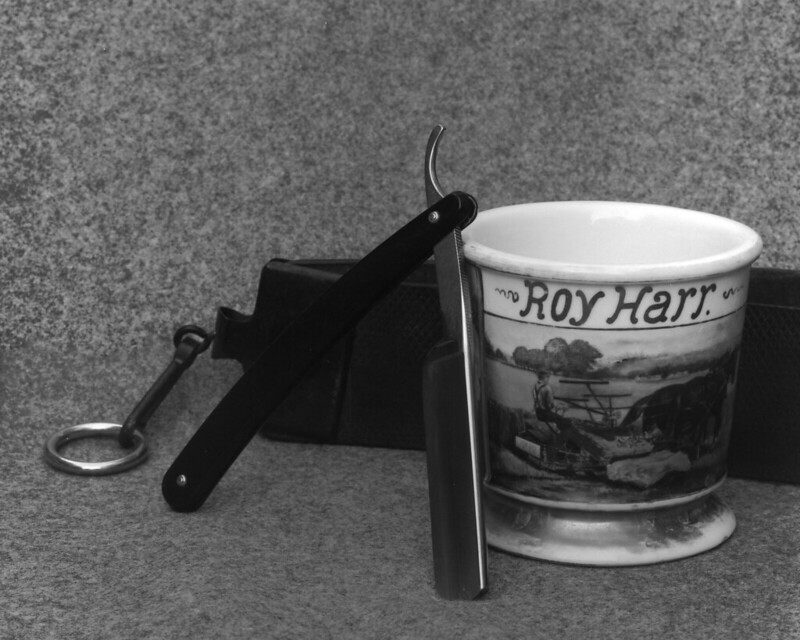
Next up is my straight razor (Dovo) along with a mug that my great grandpa's sister hand painted for him. He used it for lathering his shaving soap and that's what I use it for as well. The leather strop behind belonged to another grandpa. I don't use it because it is pretty worn with lots of nicks, but I keep it hanging with my new strop.

Shave Like Your Grandpa 3

The photo details:

  • Standard Cameras 1.0 4x5 camera
  • Kodak Ektar 203mm/7.7
  • Cat Labs XFilm 80
  • HC110b x 8.75 minutes

Saturday, August 3, 2019

Controlling Weird Film

Sometimes I buy 'weird' film on a whim. I was recently noticing that my supply of 8x10 Kodak Clinic Select Green x-ray film was running low. I bought 100 sheets of it a few years ago and for the most part I cut it down to 4x5 sheets and shot it in my Graflex Speed Graphic. I had good luck developing it in various developers using the Mod-54 device. The emulsion is very thin and on both sides of the film, so it tends to get scratches where the Mod-54 holder grips it. But other than that I was happy with the results. So I went looking for some more. I found it, but not before I noticed a box of Kodak Camera 2000 film in 10x12 for sale. That's 6 sheets of 4x5 per sheet of 10x12, so that made it very cheap to shoot, but I knew nothing about this film. So the research began. Turns out that it is copy film for line art and half-tone images (like newspapers print with the grid of little black dots of varying size to create the illusion of grey scale). So it is a 'black-or-white' kind of film... very high contrast. The only example I could find of true pictorial use was from Mike Rasso on Flickr. Even then he had only posted a couple of shots. They were contrasty, but not terribly so. The catch was the iso. He had shot it at iso 0.8! Now that's some slow film. But if you have read many of my other posts, you will know that I'm not afraid of low speeds. You might say I'm a low speed junky. So that was it. I bought the box and set about reading the Kodak spec sheet in anticipation of taming this beast. It is ortho-chromatic. That is to say it has no sensitivity to red light. That's a bonus when it comes to cutting 10x12 sheets down to 4x5 since I can work under a safe light and don't have to operate the guillotine cutter in total darkness. The base is 'thin'. I read this, but didn't really realize what they meant by that. I have used thin base films in 35mm and it can be a bit of a hassle, but this was large sheet film. Certainly it wouldn't be THAT thin. But it is. It's really thin. That makes tank developing a little more tricky. You can't slosh it around or it will come out of the Mod-54 tracks and stick to other sheets and hilarity will ensue. The one thing I didn't anticipate was that it is not notched. So it's difficult to tell which side is the emulsion side. I took a sheet out into the light and looked at it. One side is shiny brown and the other side is shiny purple. Neither one gave an indication by visual inspection that it was emulsion. So I put a drop of developer on either side. Sure enough, the purple side turned deep brown and the brown side stayed brown, no change to speak of.
The next question was "Which developer will make the best negatives?" My go-to is Parodinal (DIY Rodinal), then My-tol (DIY X-Tol), but for this I thought I would try an off-the-shelf developer. So I bought my first bottle of HC110. This is a legendary developer for those who wade into the miry waters of long-expired film. It does a good job developing the exposed silver without bringing up the base fog. I thought I would give it a try on this odd-ball film to see if I could coax some length into the tonal range. So I tried a high dilution (Dil. J) which is 1:150. For the first go-round I thought I would do tray development under safe light since I had no idea how long I would need to develop this stuff. As it turns out it's still hard to see how far the development has progressed, so it's still largely a guess. My first try I shot at iso 6 (by accident) I pulled at 6 minutes. That seemed really short, but I could see an image and didn't want to over-develop (I'm scanning, not wet printing). Here's the result:
That looks pretty good off the scanner. If I zoom waaayyy in, there is no detail in the darkest shadows. In fact, you can see the weird 'plaid' pattern of the substrate. That means there is really no exposed silver there and it happens with thin negatives, but at 'sharable' resolutions, it looks fine. It is too thin to ever use for either contact printing or wet enlargement. IT's okay. I got an image with a full range of greys and little to no grain at all. I'll count that as a success.

The next shot was at iso 3 and developed for 8 minutes. The negative was still pretty thin. Here it is. You can see that the handle of the knife and the bowl of the pipe are a bit lighter and the highlights on the blade are a bit whiter. Overall there is more contrast, but it is still manageable. The negative is still too thin for printing, so maybe a little stronger developer is called for.

I have in the past added a little bit of Parodinal to dilute developers to give them a 'boost' and put some meat on otherwise bony negatives. So next I added the same amount of Parodinal as HC100 (1:150 of each, bringing the 'developer' dilution down to 1:75). I also bumped the iso down to 1.5. This negative is definitely lower in contrast, but not really more dense. You can also see the fog rolling in around the edges. This is heading in the wrong direction.

Finally, I shot one at iso 0.8 like Mike Rasso. It just exaggerated all of the problems with the previous one. There is definitely a LOT more experimenting to do with this film to get it where I want it. Good thing I have 600 sheets of it!!

Saturday, June 8, 2019

To 85B, Or Not to 85B...

I have a box of 4x5 Kodak 4325 Commercial Internegative Film that expired in 2004. I got it cheap, as I do most of the film I shoot. Internegative film was used to make a negative from a color corrected positive that would then be used to make positive copies for distribution. Normally you see this in the motion picture industry using 35mm stocks, but I suppose magazines and such could use the same process with sheet film. As you might imagine, this was not intended to be used 'in-camera'. It is copy film that would be used in a very controlled environment in a copy machine of some sort. It is tungsten balanced (again not for daylight use) and very fine grained. After all, if you went to all the trouble of making a good positive, you don't want to lose information by copying onto grainy internegative film. With very fine grain comes a very low ISO rating. I rate this film at about ISO 1. That is really slow. I could go as high as 5, but 1 is easier for me to remember. Why is 1 easier to remember than 5?? The human mind continues to be a mystery.

Being tungsten balanced means that colors look 'normal' when this is shot under tungsten (incandescent) light which is a warm yellow color. Out in the daylight which is a bright slightly blue/white, things look quite blue. The 'analog' solution to this is to use color correction filters. These are filters you put on the front of your lens to change the color of the light entering the camera from something like daylight to something like tungsten (orange filters), or vice versa (blue filters). Since I have tungsten balanced film that 'expects' yellowish light and I want to shoot out in the blueish sunlight, I need the orange filter known as 85B. There is an 85C also that is less intense for use later in the day when the light is already turning orange outside.

I took a couple shots of the same thing out in the garden, one without a filter and one with the 85B. Then I developed them normally in C-41 chemistry and scanned them, only adjusting for contrast. Then I took them into Photoshop and corrected each of the RGB histograms, adjusting them each to full scale. Then I masked off the left half to see what the image looked like out of the camera compared to what it looked like corrected in PS.

First the unfiltered shot:

unfiltered

And the one with the 85B:

85B filtered

Looking at the left half of each shot, you can see a clear difference made by the filter. On the right side that has been further corrected in PS, the shadows are still sort of blue/green on the uncorrected shot. I could probably work that out with some more time and effort on the computer, but the point of being careful and intentional with analog photography is so that I don't have to spend my life on the computer. I want to make nice photos in my camera and on the negative. Sometimes that means putting a filter on the front of my lens to get the colors looking the way I want them.

Finally, here is a shot out in the broad daylight, also shot through the 85B. This one is a little more colorful and interesting. It is your reward for reading through my article, so enjoy!

Squash flowers

Sunday, March 17, 2019

To Bleach Or Not To Bleach

Bleach bypass is a process that has intrigued me for a while. Recently, while listening to Matt Melcher's podcast Box of Cameras, he mentioned using this process in an upcoming project. I had tried this before and not really liked the results, but this prompted me to try again since he specifically mentioned Fujicolor film and I happen to have some of that in the fridge. It is Expired (2010) Fujicolor 100, and he is using Fujicolor 200, but I figured "How different could it really be?". It's that kind of thinking that often gets me into photographic trouble. But that's how I think, so waddaya gonna do?

To take a step back, what is bleach bypass? Well to answer that, you have to know the various steps in color film processing. The steps are:

  • Develop
  • Bleach
  • Fix
There are various stop baths and rinses and washes in between these, but these are the chemically important steps. So knowing that, it becomes obvious from the name, that bleach bypass skips the bleach step. So what does that mean? Well, let's dig into the process chemistry a little more.
  • Developer does what it says. It develops the silver image, just like with black and white film. Byproducts of the silver development activate the color dyes selectively so that color dye clouds are formed in the emulsion.
  • Bleach converts the developed silver back into silver halides, basically 'undeveloping' the silver image.
  • Fixer, then dissolves away the 'undeveloped' silver halides, just like in black and white development, leaving just the color dye clouds in the emulsion layers.
So, if you skip the bleach step, you are leaving the developed silver black and white image on the film. If it isn't converted back to silver halides, then the fixer does not remove it. So what does all of that mean? What is the point? Basically, what you get (to varying degrees with different films) is an image with muted (possibly shifted) colors and higher contrast. It is a distinctive look, but don't take my word for it. Take my pictures' word for it.

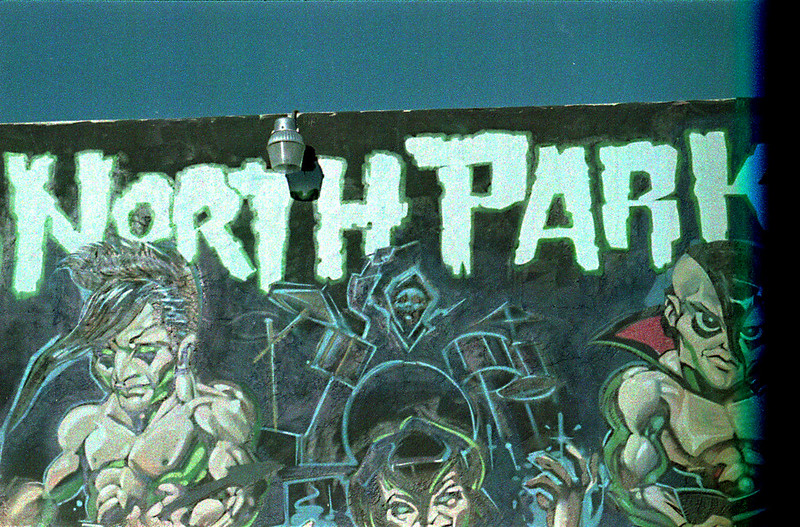
I developed this picture of a mural in the North Park neighborhood of San Diego using bleach bypass. Now I didn't get quite what I thought I would or even what I wanted. There was a base fog because the film was 10 years expired and of unknown storage history. So the negatives were very dense and my scanner (Epson V600) had trouble pushing enough light through them to get the image. So there is electronic noise on top of the add grain from the remaining silver. So what to do? I just took the strips and dunked them in the bleach (room temp for about 15 minutes). Curiously, I did not need to re-fix. The negatives were nice and 'clear', that is the base fog was gone and they looked like normally developed color negatives. One more note is that I used ECN2 chemistry on these. That system is meant for use with motion picture films, but this was just regular old color negative (CN) film designed for C-41 development. So technically, this is a cross process, though not a drastic one like developing slide film as negatives.

So here are the results, first the bleach bypass, then the same image after bleaching.. Let me know which you like better. I personally like the bleached image better, but I will definitely try this process with other film stocks. Since it is 'reversible', there is really nothing to lose.