Showing posts with label adonal. Show all posts

Monday, December 15, 2014

The Flying Leatherneck Aviation Museum

Ever since I was a little kid, I loved airplanes. The thought of flying was the most thrilling thing I could think of. In 1976 when I was 9, a show came on TV called Baa Baa Black Sheep. It was about Marine Attack Squadron 214, AKA The Black Sheep Squadron. This was a squadron of 8 F4U Corsairs, which immediately became my favorite fighter. I guess it still is. I love the look of the plane. The inverted gull wings and the enormous engine make it so unique and in fact proved to be a formidable fighting machine, serving from 1942 - 1953. But I really just like planes in general, so when I get the chance, I drive a couple of miles over to MCAS Miramar where the Flying Leatherneck Aviation Museum is. Last week I went over and took my 50's vintage Graflex Speed Graphic with a Graflex Optar 135mm f/4.7 lens and some sheets of Ilford Delta 100 film. The day was cloudy, so exposures were a little tough. Working with a large format camera means you are taking time to do everything and double checking it all before you trip the shutter. On days when clouds are covering and uncovering the sun every 30-60 seconds, that's a problem. So I just took an average reading and figured I would stand develop the film and that would correct for overs and unders. So here are the pics from my day at the Flying Leatherneck Museum.

Leatherneck 7 Leatherneck-8 Leatherneck-9 Leatherneck-4 Leatherneck-2 Leatherneck-5

Sunday, September 7, 2014

Rookie Mistake

I developed some film this weekend. Two rolls of 35mm film went into my Patterson tank along with 500 mL of 1:100 Adonal. Did you catch that? I didn't until I took the developed film out of the spool to hang dry. And there it was... a strip of undeveloped (clear) film along the entire length of the film. I knew immediately what had happened because I had done this before. There had not been enough developer in the tank to cover the top of the reel! What!? I was sure that 500 mL was enough to cover 2x35mm rolls. So I looked at the bottom of the developing tank where there is embossed the volumes for different film types. I was certain I would see 1x35mm - 250 mL, but I didn't. It was 290 mL for each roll. So there you have it. Just a short entry this time to share this cautionary tale. Always read the instructions. Take nothing for granted.

Thursday, July 24, 2014

Pacific Southwest Railway Museum

A couple of weekends ago, my family packed up for an outing. We live in San Diego which is pretty hot in the summer, but with two boys in school, we don't have a lot of options for getting out of town. The youngest wanted to go 'camping', but here in So. Cal. the camp sites have to be reserved and they get filled up about 6 months in advance. So there we were without a reservation, wondering where we could go. So with a little searching, we found a small lake down near the border and out east about an hour away. It was going to be hot there too, but at least we could get away from work and 'routine'. One of the up-sides of this location was that it was near Campo, CA and in Campo is the Pacific Southwest Railway Museum. I figured that there would be ample photo opportunities there, so I brought my large format (4x5) Speed Graphic and 6 sheets of Kodak CSG x-ray film. Taking only a limited number of sheets forces me to slow down and consider my shots more carefully. So here are the three best shots from that day.


I have to say that I was pleasantly surprised at the museum. I am not an 'old train guy'. I am an 'old camera guy', but the two are oddly akin. They are machines of a bygone era that hold a fascination for those who still use them. They are more mechanical than electronic, with gears and springs and levers doing the precision work of taking photos or moving people and cargo. The Pacific Southwest Railway is definitely worth a visit. The 12 mile train ride through the rugged California back country is wonderful for all ages. The display house has some great engines and restored cars that you can get right into and feel like you have stepped back in time.

I hope you take a trip down to Campo and see the Pacific Southwest Railway Museum. It is worth the drive and if you bring along your camera, you will be rewarded with lots of great photos.

Monday, July 21, 2014

Pushing Through XV - The Final Entry

I have really enjoyed putting this series together. Looking for examples when I was out walking around my suburban environment turned out to be easy. Finding somewhat unique examples at a time of day that rendered them aesthetically pleasing was a bit more of a challenge. I always had in mind the photo I wanted to end the series with and so when I saw it while hiking around Lake Morena, I took a couple of shots with my '39 Voigtländer Bessa on some expired Tri-X I had loaded. It was mid-day, so the light is less than desirable, but I took the photos anyway and now I think it is time to bring this to an end and move on to another photo project. I hope you have enjoyed the series and look forward to any comments you would care to contribute.

Tuesday, April 22, 2014

Springtime in San Diego

Here in San Diego, California we have two seasons. There is Warm Summer and Hot Summer. Right now we are still in Warm Summer as it is late April and Hot Summer doesn't really get here until late July. But I know that Hot Summer is coming because the Coral Trees are in bloom.

I took this photo with my Graflex Speed Graphic using the Optar 135, F/4.7 lens. I shot it on Kodak Clinic Select Green x-ray film and developed in 1:100 Adonal for 4.5 min standing. I hope you are enjoying the change of seasons where you are.

Friday, March 28, 2014

Transitioning Off Of Flickr

Looking back, I can see that it was inevitable. Flickr started making massive and dramatic changes to their site maybe around a year ago. At first they called it a 'Beta' and you could opt in or out. There was a seemingly huge backlash and people were writing scathing reviews on the photo forums and in the Flickr groups. Many people left at that point and found alternate places to host their photos. I tried to work with the Beta for a while, but eventually got fed up and tired of being frustrated, so I switched back to the older version of the user interface. I figured that Flickr would hear the outcry and modify their plans to change things so drastically. It was sort of 'out of sight, out of mind' for a few months, but early this week, they switched everyone over to the 'new' interface. No warning, no choice, and it was just as bad as I remembered. Additionally, my account is experiencing a bug so that I can only embed the original size photo here in my blog or on the forums where I like to share. Well, that is the proverbial straw that has broken the camel's back. I will not be loading photos on to Flickr and I have cancelled my 'Pro' account. I am going to give iPernity a try and see how things work over there. I did encounter one serious limitation initially, but have subsequently figured out a work around for it.

The problem was that I didn't want to jump into a paid 'Club' account right away. That meant that I did not have the functionality to get the embed code in html or bbcode so that I could share photos on my blog or the forums. I couldn't even get the url of a photo by the usual right-click -> Copy image url. It was completely blocked (as it is for all of their 'free account' users)! Now that seems a little dirty to me. The whole reason for using an image hosting site is to share your photos elsewhere. At least that is my primary use case. So what to do? Try another host like pBase or Photobucket? I didn't really feel like trolling around looking for the one image host that 'has it all', and I knew that many of my contacts from Flickr had moved to iPernity. As with many things in life Google has the solution! I generally use Chrome to browse the interwebz. I also have the benefit of being a bit of a computer nerd and have done some web development. So I thought I would just give the old CSS inspector a look to see if there was anything helpful there. Right click on the image and select "Inspect Element". Make sure that the "Elements" tab is selected at the top of the window that pops up at the bottom of your browser. There you will see a bunch of code. This is the cascading style sheet that controls what everything on a web page looks like (colors, fonts, layout, etc.). Right there on the highlighted line is the url (web address) for the image! BAM! Just what I was looking for! Now I can use that url to link directly to my photo. For the blog, I use html tags like this:
<img>http://u1.ipernity.com/41/63/61/31446361.32e384e1.640.jpg?r1</img>

For online forums, I use bbcode like this:
[img]http://u1.ipernity.com/41/63/61/31446361.32e384e1.640.jpg?r1[/img]

If I want a different size, I just select that size on iPernity so that I am viewing it and repeat the right click inspect element step. Then I have the url for that size image. Easy Peasy!!

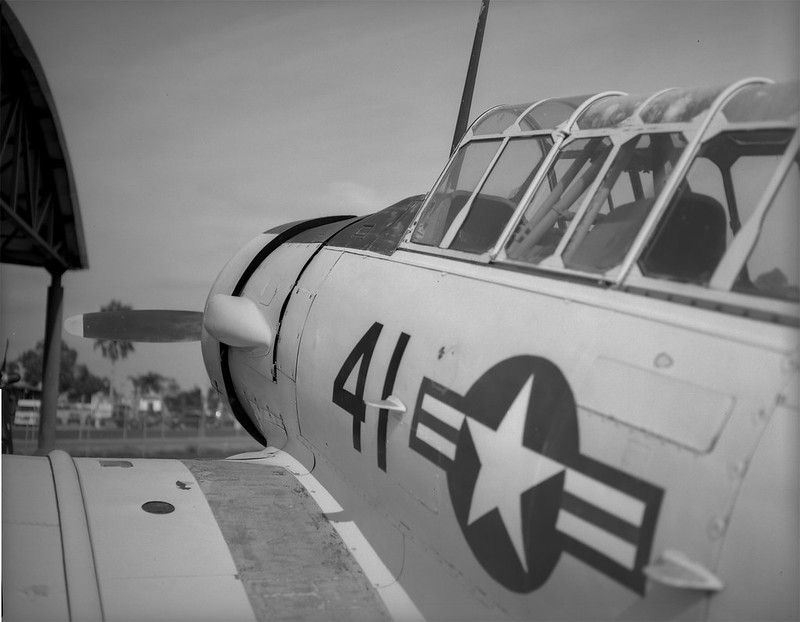
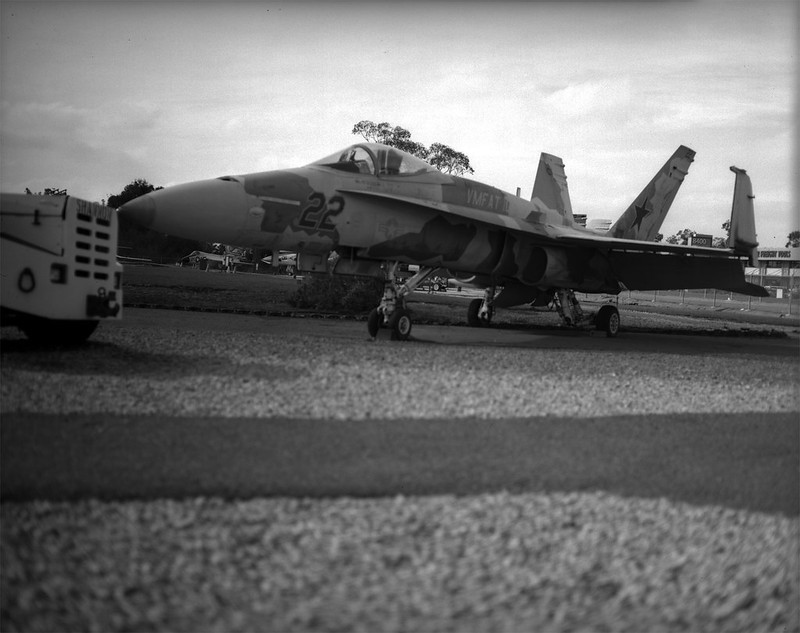
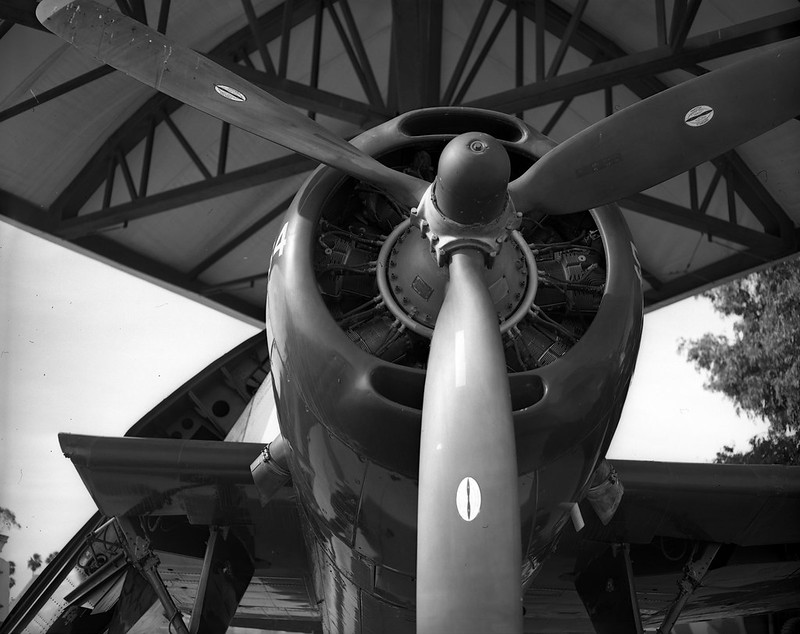
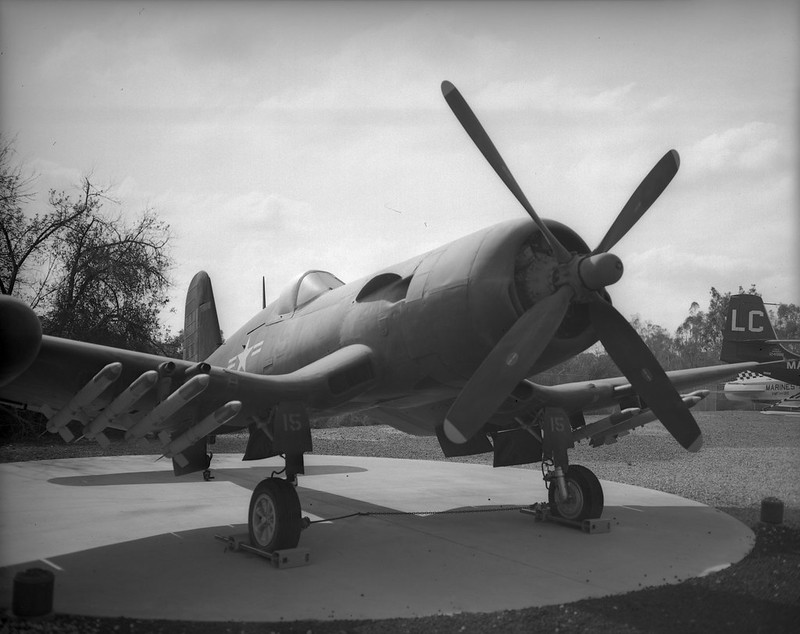
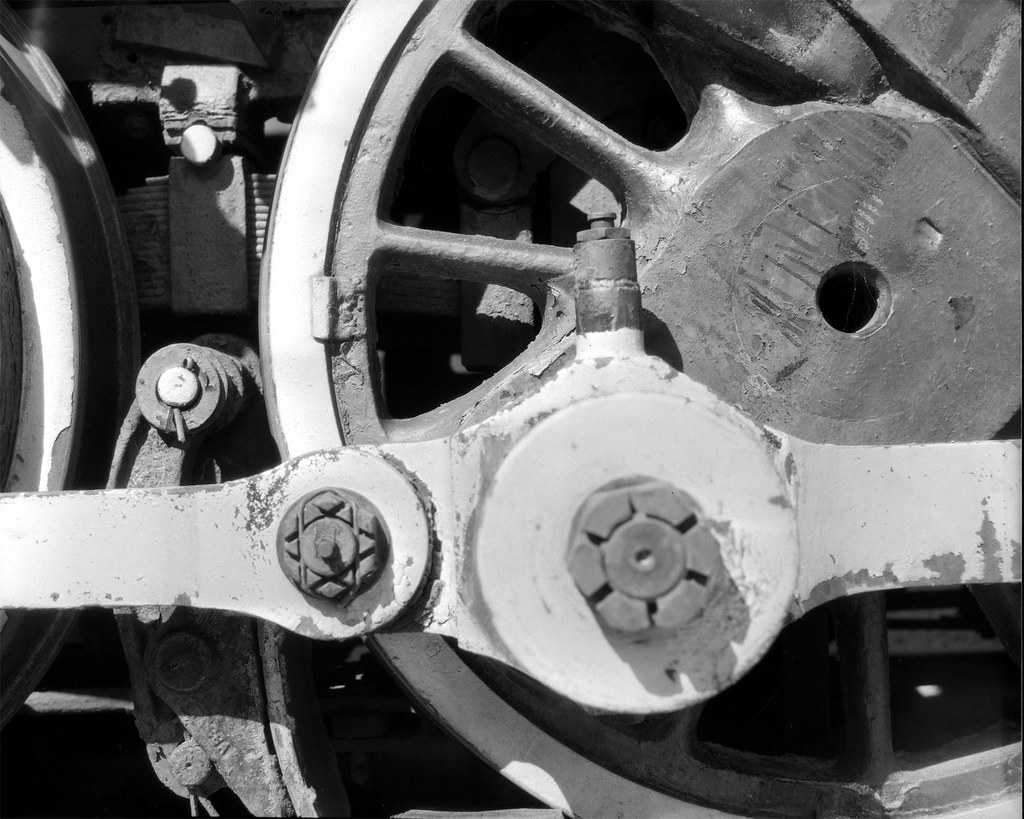
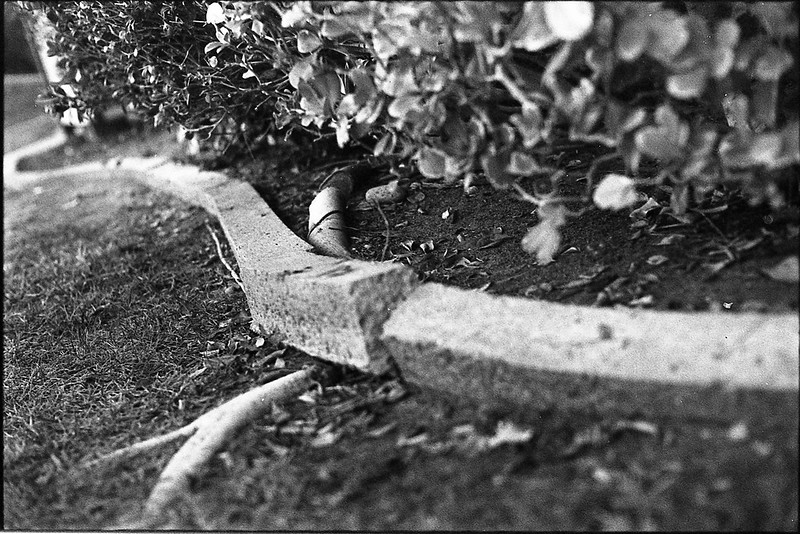
I hope you find this helpful especially if you are migrating away from Flickr like I am and want to try iPernity for free for a while. Here is a photo from the first roll out of my 'new' Yashica Electro 35 GSN. This is a rangefinder camera from the mid-70's that was mass produced. They are super easy to get in good-ish condition. They do have some inherent issues, but if you aren't afraid to get your hands a little dirty, and open up a camera you probably paid less than $30US for, then it is a no-brainer. Just go get one. They come with a pretty darn good lens, the 45mm Yashinon 1:1.7. That's right, a nice sharp, clear, contrasty f/1.7 on a cheap camera. I shot this photo on some old Ilford FP4 that had expired back in 1981, so it is a little grainy, but over all I like the look.

Tuesday, March 25, 2014

Pushing Through XII

Wow, it's been a while since I've done one of these. This one is a root of a Ficus benjamina tree. If you live somewhere that these trees grow then you know what the roots do. They creep along the ground just under the surface and then they start to grow so that they break the surface and anything that has been built on it. That means that concrete sidewalks, barriers, foundations, etc. are all going to break. These are the trees that are going to be the rock smashers that level the cities after humanity has extinguished itself. For now though, they are an inconvenient beauty that decorates our landscape.

Pushing Through XII

Monday, March 24, 2014

Normal Lens Macro

I may have posted something about this in the past, but I'm too lazy to find out, so forgive me if I am being redundant.

Lots of people take macro photos these days. Hop on over to photo.net and you'll see what I'm talking about. Most of the examples on that site are amazingly sharp and bright and colorful. That is because they are taken with digital SLRs equipped with a 'macro' lens of some sort and then the photo is cropped down even closer. This can be done because of the high pixel count of the newest sensors as well as the sharpening algorithms used by modern editing software. Now I don't have a macro lens, so I have to make due if I want to get close. Most of my lenses have a minimum focusing distance of about 2ft, so I have to do something different to get up close to my subject. This is a technique that I learned a long time ago, so it must have been out of Popular Photography or Photographic magazine. Yes, I was taking photos well before the advent of the world wide web. What I do is to take my normal prime lens off of my SLR. In this case it is a Nikkor 50mm 1:1.4 lens on my Nikkormat FTn. Then I flip the lens around so that the mount is facing outward and I hold the outer part up to the camera, pressed against the front. Got it? I'm just holding the lens backward against the front of the camera. There are 'adapters' that will convert your lens mount to a male screw mount so that you can use the filter threads to actually hold the lens in place, but I have never really found I need something so elaborate. Make sure the lens is stopped down a bit and focused at the minimum distance. Then you are going to have to move closer and farther from the subject until the focus is just right. The more you stop down, the more will be in focus (normal depth of field principles apply), but things are going to get really really dim in the finder window, so f/8 is probably about as small as you want to get with the aperture. I think I was more like f/2 for these photos. That makes for some shallow DOF, but I like the effect.

The film was some Ilford FP4 that had been rebranded as generic "Professional Film". It had expired back in 1981, so I shot it at iso 25. Development was in my old stand-by Adonal (Rodinal) diluted 1:100, developed for 70min with 10sec agitation initially and at 35min. What you see is pretty much how it came out of the Epson V600 scanner. I did a little dusting in PhotoShop. So what are you waiting for? Get that normal lens off of your SLR and take some great macro shots of your own! Jasmine I

Jasmine II

Tuesday, December 24, 2013

2 Cameras, 2 Films, 1 Subject

I didn't really take these two photos with a blog post in mind, but I ended up scanning the films together and so the comparison was inevitable.

The first was taken with a c. 1939 Agfa PD16 Clipper. I wrote about this camera recently, so click the link to find out more about it. The film is expired (1981) Tri-X, so I expected some grain. I took the photo indoors near a bright-ish window, but still it was under-exposed for sure (probably f/5.6 at about 1/40th). The processing was done in Adonal diluted 1+100 with semi stand agitation (10 sec init and 10sec at 35min) for 70 minutes. That should have brought the grain under control a little, but I think the other factors were overpowering. The grain is "pronounced" to say the least. The contrast is low, the DOF is not bad, but I am a little too close to the subject, so it is soft. These work to emphasize the grain. So what I ended up with was a photo that looks very old indeed. I think the treatment actually works with this subject, so I am happy to share it.

The next one was taken with my trusty old (c. 1967) Nikkormat FTn with the awesome Nikkor 50mm f/1.4 lens. This lens has great clarity and contrast and takes pretty sharp photos if I do my part and hit the focus correctly. Development was identical to the image above, but the film was slower. Initially it was some generic "Professional Film" rated at asa (iso) 125. Being that it expired in 1981, I rated it at iso 50 and hoped for the best. I will definitely be posting some more photos from this film since I have 100 ft of it. It turned out quite nice, I think. Everything I would expect from this camera/lens and good film. There may be a bit more grain than it would have had 30 years ago, but it is nowhere near as pronounced as with the Tri-X above that expired in the same year.

I hope you have a wonderful Christmas. If you were nice, maybe Santa will put some expired film in your stocking!

Saturday, November 16, 2013

100 Strangers 2&3/100

A couple of weekends ago I was at the big weekly swap meet, what my UK counterparts might call a 'car boot sale'. I took my Graflex Speed Graphic just in case there was something to photograph while there. I figured with that many bargain hunters walking around, there would be some good opportunities for my 100 Strangers Project. Most of my time was spent looking for bargain basement prices on cameras in good condition. Well, I didn't really find any of those, but carrying around a Speed Graphic did make for some easy introductions to strangers.

This is Denny. He was selling some very cool barware. Mostly he had martini shaker/glass sets that were printed with various themes. I don't like martinis, so I didn't pay much attention to his wares, but from watching him work you would have thought he was selling used cars. I mean this guy could talk you out of your shirt and sell it right back to you. So when I walked by, he immediately commented on the camera. He wanted to know all about it and I was happy to talk with him. At the end of the conversation, I asked if I could take his photo. He agreed, but while I was metering and focusing, another mark entered his line of sight and he was off to close another sale.

Denny This guy also asked about my camera, but was really just interested in what I paid for it. I got a few questions like that from various people. I assume that this was a piece of information they wanted to tuck away in case they ever came across one to buy or sell. Anyway, this guy was sitting in this big old wicker chair talking about the good ol' days in the clubs when you would sit in a chair like this and have the ladies come sit on your lap. The funny part came when he would try to convince some young (or not so young) lady to come sit on his lap. The looks they gave him were priceless. And I think he was truly surprised and disappointed that they would not come and sit with him. I had to get a photo of this guy. The other guy was I think just a passer-by who wanted in the photo.

King-of-Kobeys

Thursday, November 7, 2013

My Dad's Stuff

I was looking around the house for things to photograph. I had my still life platform all set, now I just needed something 'still' to put on it. I saw my dad's old Sovereign Harmony sitting in the corner, but that's too big. So I walked around a while and noticed his old "Beer" cup. That would do. But it was lonely just sitting there by itself, so I grabbed the guitar and leaned it up against the stage so at least the head could get in on the act. My dad told me once that he used to actually drink out of that cup until he figured out that it was painted with lead paint. Then he stopped and it became a pencil holder in the kitchen for as long as I can remember. The guitar was also a fixture and I can still hear him singing sad songs and strumming away. Dad's been gone almost 11 years now, so memories will have to do.

"Hear that lonesome whippoorwill,
He sounds too blue to fly.
The midnight train is whining low.
I'm so lonesome I could cry."


Dads stuff

Monday, October 14, 2013

1/100 Strangers

So I decided to embark on the 100 Strangers Challenge. It is a pretty simple concept. Take a portrait of 100 strangers. That's it. Okay, it's a little more involved than that, but not much. The idea is to take portraits, not candids from 200ft away with a telephoto lens. It is designed to improve two things; your portrait photos and your ability to connect with your models. I am personally terrible at connecting with my subjects. I am on the far end of the introversion scale and striking up a conversation with a complete stranger has a very high threshold energy for me. Making a request is even harder. So I need to improve and that means practice.

I drive past a high school in my neighborhood almost every day. For the last month or more, I have noticed a school bus parked out on the street, presumably waiting for athletes or some other group that is at school late. Inside the bus, the driver is waiting, but not just waiting, practicing. He is playing a trumpet... every time I drive by. So I thought that this guy would be a good first subject. He was already inspiring me with his dedication to his art.

I pulled over and carried my Speed Graphic over to the open bus door and explained that I drove by each day and asked him what kind of music he was playing. We talked for a short time and I explained that I would like to take his photo. He agreed and said that he wanted to do it out on the grass. I thought it would be a great shot inside the bus, but he was clearly uncomfortable with that, so I didn't press it. Anyway, here it is. Unfortunately, I think I over-developed it, so it is quite grainy. I don't know, sometimes that grows on me. I will have to look at this one a few more times.

This is my first stranger.

100 Strangers 1/100 - Roberto

Sunday, October 6, 2013

Flawed Mod

If you were fortunate enough to read my scintillating previous post about the pinhole camera, you probably finished it scratching your head, thinking... "Why would he shorten the focal length to get more coverage on his film?" The truth is that I was doing the same thing. It didn't make sense intuitively. If the pinhole is closer to the film, that should just make the image smaller. How would that effect the area of coverage? The answer is this... it actually doesn't make the image smaller, but it does change the magnification. It is the same effect of changing from a 50mm lens on your 35mm SLR to a 28mm lens. Things get smaller but the image stays the same size (36x24mm). This is done through the magic of optics. The glass lens elements manipulate the light path so that you can change focal length and aperture and not change the size of the projected image circle. I don't have any glass lens elements on this camera though. So changing from 115mm focal length to 81mm focal length has the effect of reducing the magnification of the scene, and if the image circle of the pinhole is big enough to cover the size of film you are using, all is copacetic. However, in my case I also changed the size of the pinhole from 0.5mm to 0.4mm, a gigantic 20% decrease! Guess what. When you reduce the size of the pinhole, you reduce the size of your image circle! So now I have an 8x10 pinhole that has an image circle big enough to cover a 4x5 piece of film. Seriously, I kept thinking to myself, "you shouldn't cut that camera down... just make another back for it." and now that is what I will be doing. I will need to calculate the right distance to cover my curved 8x10 (~126°).

For your viewing pleasure, here is a crappy still life I took after cutting down the camera. Back to the drawing board.
Fruit

Saturday, September 28, 2013

Blurry Self Portrait

I recently saw a post over on FilmWasters.com where the author/artist posted a whole roll of photos where he admittedly
... made quite a few mistakes with focusing and exposure.
I thought this was quite bold to post publicly some shots that are not one's very best. It makes you artistically vulnerable. Now, granted the FilmWasters community is warm and welcoming and humble; very unlikely to tear apart a fellow 'filmy'. But even at that, I thought it was a really good post. They were putting themselves out there in hopes that they could educate or inform someone. Now here is the 'weird' thing. I actually liked the photos! They were blurry, but still picturesque. They were taken on expired color film, so the color and contrast were shifted slightly which lent more to the painterly qualities.

So I am taking heart from this person and have decided to post a photo of mine that did not turn out the way I expected (or wanted). I was going to just bin it, but after thinking about it for a few days, I am posting it here.

Not Looking

I took this self portrait with my Speed Graphic. Of course there is no 'auto focus' so I had the task of figuring out how to focus on myself. The short answer is that without some elaborate setup with mirrors and magnifiers and perhaps some technology on load from the NSA, I can't. The best I could do was to focus on the back of the chair I was going to sit in and then turn the focus knob back just a bit. Then I stopped the lens down to f/8. This gave me a 1/5 sec exposure which is about as long as I thought I could reliably hold still. Then I loaded the film, attached a long cable release, sat down and tried to visualize where the plane of focus was. "CLICK" Now to the darkroom to see my masterpiece! WHAT!!?? Out of focus!! Well, I'll toss it and try again later. But not this time. I am going out on an artistic branch and posting this photo on Flickr and here. Let's see what the fates bring to this mistake.

Wednesday, September 25, 2013

Ornamental Shrubbery

Berries
I took this photo with my '51 Graflex Speed Graphic camera. I was walking around with it hand-held, which I don't do very much because it is heavy and my eyes aren't always good enough to use the range finder effectively. So usually, I tripod up and focus on the ground glass. This day though, was bright and the sun was just starting to get a little angular, so the shadows were good, but there was still enough light to see the overlapping images in the range finder. I shot this at f/8 x 1/200 sec on Kodak CSG x-ray film rated at iso 80. I developed the film in Adox Adonal (Rodinal) 1+100 for 4.5 min in a Patterson tank with a MOD 54 film holder. I scanned the negative at 2400 dpi with an Epson V600, taking two passes and stitching the two scans in Photoshop.

WHAT!!?? 2400 dpi?? Yes, I had the scanner set that way because I had been scanning some 6x6 photos from an engagement shoot I did earlier in the week. I didn't notice until I saw how long the first scan was taking and by then, I thought what the heck, just let it go at 2400. When you scan a 4x5 negative at 2400 dpi, you get about 115 megapixels. That is a huge image and really unnecessary unless you are doing billboard work. But I had it anyway and didn't feel like tossing it and re-scanning (note to self: next time toss it and re-scan it). The problem with such an enormous image comes when you go to load it up in Photoshop to do some dust spotting with the healing tool. At 2400 dpi every single microscopic spec of dust is visible (note my screen resolution is only 1366x768) and with a 15px brush, that takes a LOOOOOONG time to go over and click each speck and hair. Save yourself some trouble and scan at 800 or 1200 dpi for normal sized prints.

The very cool thing about these berries is that they are now just sort of yellowish green, but once "winter" comes to San Diego and things get really dry, they turn bright yellow and they pop open along the seams. Inside is sort of a shiny, creamy white with three bright red seeds inside. It is really beautiful. I will try to get some photos this year and post them here to follow this up.

Anyway, I hope you enjoy the photo. I think it came out well.

Saturday, September 7, 2013

Unsafe Light

I had had a couple of failures using Kodak CSG x-ray film in my pinhole camera. They came out WAY over-exposed. One was this photo of Jim's Beemer. I had a nagging suspicion in my head that the problem was with my safelight. I used a 3-LED headlamp. It is pretty bright, but I usually point it at the ceiling and not directly at the film. However when I was developing these, I had shone the light right down into the developing tray. So I needed to do some experiments. What if I cut, loaded and developed in complete darkness? That would give me information about the safelight variable. I was also curious about whether the film had somehow changed or maybe the pinhole had been damaged and I was over-exposing in the camera. So I took the same photo twice; once at my 'normal' calculated exposure (47 sec in this case), using iso 80 for the CSG. Then I took another photo one stop down (24 sec). This would tell me something about the accuracy of my exposure table. So here are the results.
x-ray-compare
I developed these together in the same tray of 1+100 Adonal for 4 minutes in complete darkness. Don't mind the scratches. I wasn't being particularly careful with this film, I just wanted to get an idea of the exposures. You can see that both exposures are passable. The one stop 'push' came out with a bit more contrast as you would expect, but both negatives are of normal density.
So I think I narrowed the problem down to the safelight. The LEDs must just be too bright. It could also be a wavelength thing. I am not sure what the spectrum looks like for these led lights. They might have an overlap with the sensitivity of the x-ray film even though it is classified as 'orthochromatic'. Anyway, there you have it. X-ray film will be developed in the dark from now on and I will continue to use my same old pinhole exposure chart with this film rated at iso 80 or 100.

Friday, September 6, 2013

The destruction of Jim's Beemer

Ok, the BMW wasn't destroyed, but the image nearly was. i was cutting down some 8x10 sheets of Kodak CSG x-ray film for the Speed Graphic and I noticed that I had some sort of oddly sized pieces of film in the bag with the 8x10's. So I decided to go grab my homemade pinhole camera and cut one of these down to fit in it. It only takes one 'sheet' at a time, so I don't load it very often, but this was just sort of asking to happen. So I load it up and set it in my 'take to work' pile with my sunglasses and keys.

About mid-day the following day, I was looking out my window and discovered that Jim's beemer was in the parking lot, which was unusual since he normally works in a different building. It was parked in front of a sort of dirt embankment that I decided would provide an adequate place to set the camera since the exposures are generally too long to hand-hold. I went out and made a little shelf in the dirt upon which to set the camera. Then I took an f/16 meter reading with my Sekonic L-508 at iso 80 and consulted my exposure table to find the f/217 exposure time. Three seconds! That sounds long, but my shutter is a piece of gaffer's tape stuck over the pinhole (did I mention this camera was homemade?) and I wasn't sure I could take it off and put it back on in 3 sec without shaking the camera a lot and making a blurry pic. So I took another reading holding the light meter vertically and sort of in the shade of the car. Another consult of the exposure table and I got 12sec! Perfect! That is enough time so that the jiggling of the camera won't cause significant blur.

I went home that evening and decided to do the development in Adox Adonal at a dilution of 1+100. I mixed the chemicals and got everything together in the bathroom. I had read that you can monitor development of this film under a safe light and since I wasn't exactly sure of the development time, I decided to keep my red LED headlight turned on. That was the first bad decision. I turned out the room lights and took the film out of the camera. Placing it in the chemicals, I started the timer. I had set my 'safe light' up on a shelf pointed toward the ceiling so as not to risk fogging the film. But then for some reason I started to worry because I could not see an image appearing. I took the light down and shone it right down into the tray where the film was. There was a bit of an image starting to emerge, so I put the light back, but the damage was done. About 20sec later the film was almost completely black. I took it out of the developer and after a quick rinse under the tap, I put it into the fixer. Six minutes in the rapid fix and I figured it was done, but it was still just black. I turned on the lights and started the final wash with little or no hope of getting anything out of my labors. I held it up to the light and could see the faint but distinctive BMW grill. It was really dark, but my scanner is pretty good at pulling out contrast where there seems to be none.

So here it is. Low contrast, extreme grain, but not completely offensive or even unartistic. I think the combination of the grain and the distortion of the curved-plane pinhole image makes a sort of interesting image. The really fun thing about this camera is that I don't really have any idea at all what kind of image is going to come out of it. That may drive the 'control your process' photographers crazy, but I like to have fun with it.

Jims Beemer

Wednesday, August 14, 2013

Fern Leaves II - Errata

In my post Fern Leaves, I said, "I exposed for 1/10th of a second as metered (no compensation for filter or bellows extension)". And that is true, but that is not the meter reading for the photo I showed in that post. I took two exposures that day. One was as metered f/5.6 x 1/50th and the other one included 2.5 stops for the filter and 1/2 stop for the bellows (that was just a guess, I didn't calculate it). It came out to f/5.6 (to keep the same DOF) and 1/10th. I know that's not exactly 3 stops, but I knew the film would have enough latitude to tolerate 1/3 stop either way. I remember thinking at the time "Three stops seems like a huge difference for one little filter and a bit of bellows extension.", but I went ahead and made the exposure, just in case the experts really do know what they are talking about. I developed both negatives together using recommended times and agitation. When I took the negs out of the tank, one was 'normal' looking and the other was very very 'thin'. That is to say, it was mostly clear with just a hint of an image on it. I said to myself with a feeling of satisfaction, "See? That filter and bellows compensation is all a bunch of nonsense!" and didn't give it another thought. I didn't think it through until I went to scan the thin negative last night. Then I thought about it. A thin negative is either under exposed or under developed. I know the development was fine since all of the other negatives came out perfectly. So that must mean that the thin one was under exposed. That must have been my 1/50th exposure. The experts were right!! I really do need to add stops for the filter and the bellows extension. So, lesson learned, and it only took me one sheet of film to learn it. Even then, it's not a total waste. I threw the negative on the scanner and figured I would get something... maybe even something interesting.

What I got was what you would expect from a severely underexposed negative... grain and contrast. It is still a decent image. It just has a little more 'edge' to it than the other exposure. I thought it was an interesting 'experiment'. Go see the Filter Factor article on Wikipedia for an explanation of how it works and a good chart of different filter factors for different brands of filters.

Which version do you like better?

fern 2 - underexposed

Monday, August 12, 2013

Crops

I generally try to compose a photo well enough in the camera that it doesn't require a lot of 'fiddling' in post production. I think that as photographers, this should be one of our goals. Improving in the area of composition is one of my most difficult tasks and one that I am always trying to achieve. Composition, of course encompasses a LOT of things, but specifically here I am talking about the relative positions of objects and shapes in the frame. The enemy of composition is the 'hurry up'. Light is fading, things are moving, dinner is burning, etc. These things all cause the 'hurry up' and when you are in a hurry, you will only get a good composition by sheer luck. Large format film is a bit too dear to leave up to luck, so we generally try to go about making photos when we know we will have enough time. But there are situations when the 'hurry up' just descends. Recently, I was at a farmer's market in my neighborhood. I came across it accidentally since it is only there on Tuesdays and I was actually on my way to a different location to take a different photo. But there it was and if I walked by, I would have to wait another week to go and see what was there to photograph. The sun was setting behind the booths and behind the marine layer, so I found myself in the middle of the 'hurry up' trying to get photos before I ran out of light.
I saw this scene and I knew that there was something about it that appealed to me, so I framed the whole thing and shot it.
Farmers market
Here comes the beauty of large format. I took my shots home, developed them and scanned them. Now I only scanned at 1200 dpi which is about a medium resolution image (about 29 MPixels). That gives me plenty of resolution to crop out the bit that I really like. I still down-res that image to upload, so I have pixels to spare and no visible grain (even with Tri-X in Rodinal!!). So this way, I haven't wasted my sheet of film. It still contained the image that I wanted to capture, and later I can revisit the negative or the original scan and re-compose again if I choose.
Farmers market crop

Fern Leaves

I'm not really much of a 'closeup' or 'macro' photographer. So I don't really have many tips on doing it right, but I do know this. Your depth of field is WAY shallower than what you are used to or expecting. Now that can be good or bad depending on what kind of composition you have in mind. A small aperture (f/22 or higher) is still going to give a pretty deep focus. For this photo of a fern on my patio, I wanted a shallow DOF and some good contrast to accentuate the texture of the leaves. If the DOF were too deep, then the texture of the leaves would get lost in the overall jumble of leaves not just of the fern itself, but also those in the background. I shot this at f/5.6 on my large format Speed Graphic, so I got a very shallow DOF. I probably could have gone with f/8 and still had a pleasing composition, but I'm glad I didn't. For contrast, I added a green filter to the lens. This had the effect of brightening up the green of the leaves and darkening the reddish brown stems.

fern
Like I said, I shot this with my Graflex Speed Graphic. I set it up about 18 inches from the fern and extended the bellows about 3 inches past the infinity stops. I didn't measure the focal length I came up with. Focusing is always a bit of a challenge (my eyes are old), but my dark cloth and 10x loupe help a lot. This was shot on Kodak Tri-X 320 at iso 320. I exposed for 1/10th of a second as metered (no compensation for filter or bellows extension). I developed the film in Adox Adonal (Rodinal) diluted 1+50 for 15 minutes. I agitated the tank (Paterson tank with MOD54) initially for 30 sec and then 4 gentle inversions every minute. The grain came out quite fine given these conditions and that it was probably a few degrees warmer than the recommended temp of 20C. This is a credit to the latitude and tolerance of this film. I really love Tri-X. It is hard to mess it up.