Showing posts with label stand development. Show all posts

Tuesday, August 18, 2015

Eucalyptol

One or both of my readers (hi mom) may be familiar with the b/w film developer Caffenol. This is made with instant coffee, washing soda and vitamin C powder. It is environmentally friendly, cheap, high quality, easy and cheap. Alright, I am cheap and Rodinal might be a little cheaper than Caffenol, but there is just something very cool about mixing household ingredients and getting film developer out of it. So I occasionally mix up a batch when I have time. There are examples around here.

Recently, there was a discussion of the active ingredient. It turns out NOT to be caffeine, but caffeic acid. So that begs the question (for me): What else has caffeic acid in it that might be readily available? The answer: The bark of Eucalyptus globulus (according to Wikipedia). This is an Australian native tree that happens to be a common invasive species in So. Cal. where I live. In fact, there are big ones just outside my front door. So it is very simple for me to step outside and collect some bark off the ground, and that's just what I did. I didn't weigh it or anything, this was more of a 'proof of concept' experiment than an optimization. So the best I could say about the quantity used would be 'a couple of handfuls'. I took it inside and broke it into little pieces, then I put those into my coffee grinder. Legal Disclaimer: Do not use anything you plan to later use for food prep when preparing photographic chemistry. I ground it up pretty fine and put it into a pint mason jar. Then I poured boiling water in and let it steep for about 30 minutes. I then poured the liquid through a coffee filter and discarded the used bark. I have absolutely no idea how much caffeic acid is in this tea (if any). I subsequently did some Google Scholar research and found a paper where the researchers could not detect caffeic acid in the bark of Eucalyptus globulus. That was discouraging, but I had come this far, so I decided to at least do a drop test on a piece of film.

To do a drop test, just get an old piece of film, expose it to the light and put a drop of your developer on it. If it turns black, your developer is active, if not, then it isn't. I had a little over 500mL of eucalyptus tea, so I followed the recipe for Caffenol C-L, adding 16g of Washing Soda and 10g of Vit. C. I didn't add any KBr. Then I topped off to 1L with distilled H2O. The film that needed to be developed was Kadak Recordak Dacomatic. This is copy film with a very thin emulsion layer and no anti-halation layer, so probably would be my best bet if the developer ended up being weak. So I cut the leader from one of my rolls and put a drop of the developer (heretofore known as Eucalyptol) on the emulsion. One minute later... nothing. Give it a little shake. Then it happened. The emulsion started to turn. First just a faint brown, then darker and darker. It was working! I swirled the drop of developer onto a different area of the film and there it sat. Maybe there was a little development, but not much. So there it was. A one-shot developer.

Now to decide on a developing time. I figured I would do a stand development, but I didn't want the bromide drag that comes with it on 35mm film. So I decided 1 hour semi-stand with inversions at 20, and 40 minutes. That way, if the dev was weak, at least I might get thin but scanable negs.

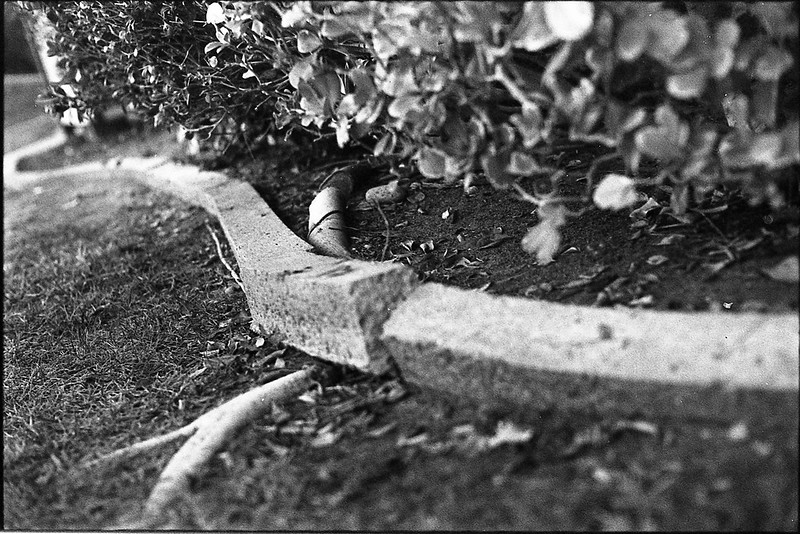
Here are some of the results:

N2020-Dacomatic-004 N2020-Dacomatic-003 N2020-Dacomatic-021 N2020-Dacomatic-018 N2020-Dacomatic-014

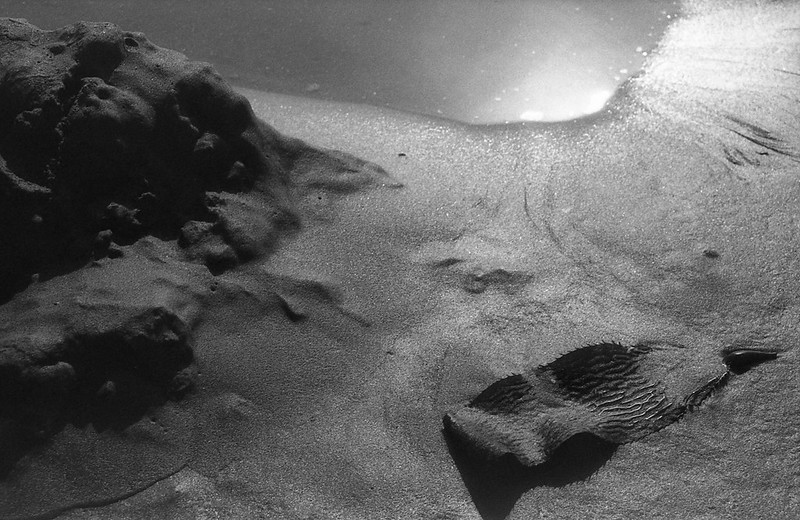
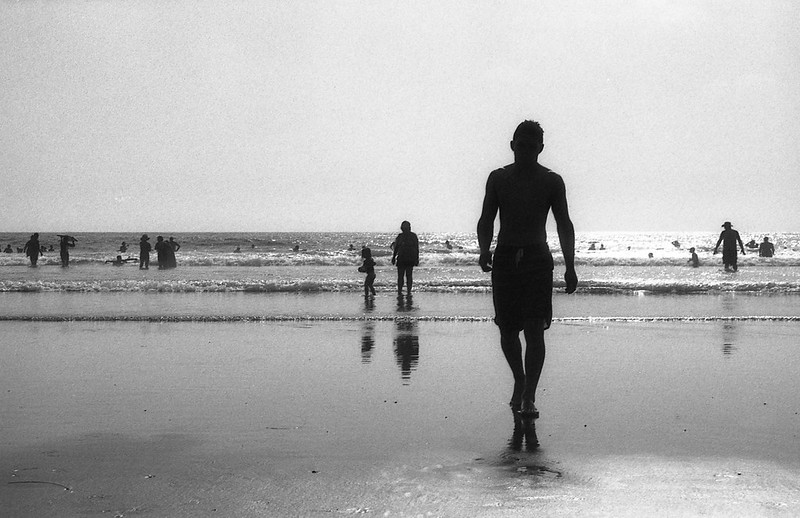
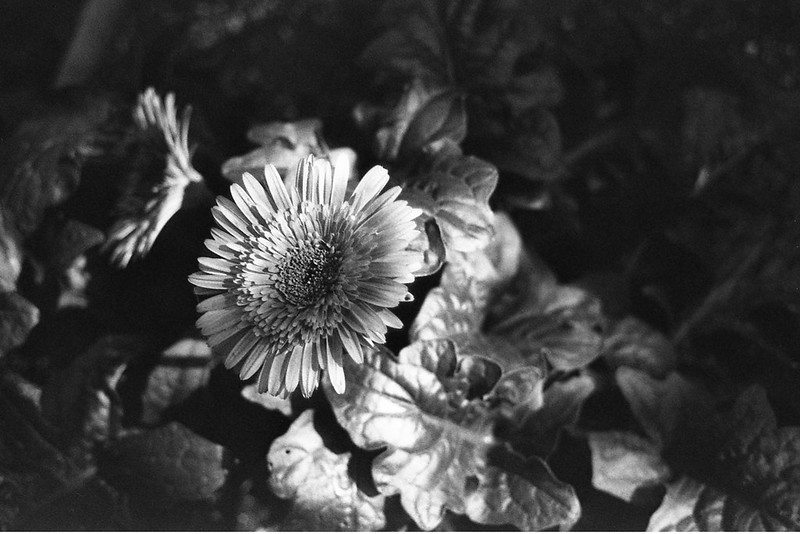
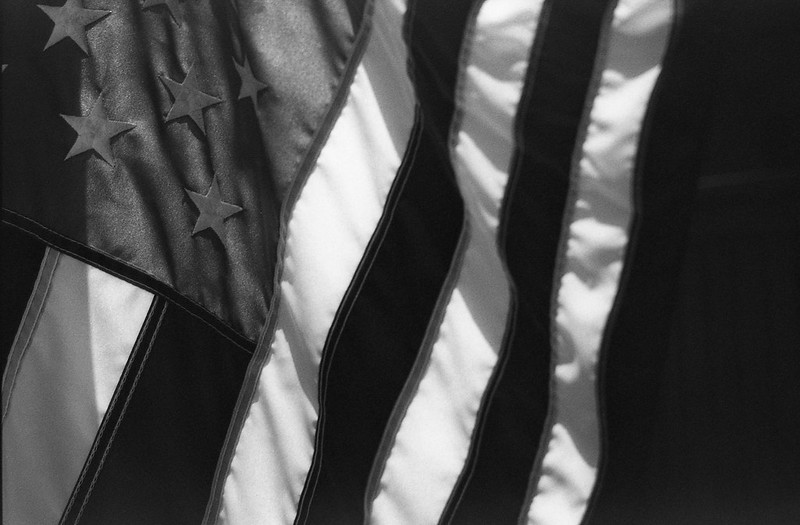
Okay, HCB I am not, but you get the idea. The tonal scale is compressed (more contrast), though part of that is attributable to the fact that I was shooting mostly in full sun, mid-day at the freakin' beach. You won't find many more contrasty scenes than that. Also the film itself is intended for copying documents, so contrast is sort of its thing. Normally, I develop this film in Adonal (Rodinal) 1:100 for 70min with inversion initially and at 30 min. That gives a pronounced grain that I find appealing. It's not for everyone, especially those who enjoy the digital aesthetic, but I like the grain. With this developer, I am going to call the grain "chunky style", but still not so obtrusive as to be distracting. Additionally, while I was doing some light dust spotting in Photoshop, I did notice some very very small pinholes in the emulsion. These appear as tiny black dots on the scan. My intuition tells me that there could be something in the eucalyptus extract that is being hard on the thin emulsion layer of this film. I am doubtful that I would see it with a regular pictorial photographic film (stay tuned).

Over all, I think this is a good alternative to caffenol for those of us who want to see just how far down we can drive the cost of developing a roll of film in a home-made developer. Here's the math. I used about $0.10 worth of washing soda, about $0.76 worth of vit. C powder, and maybe a nickel's worth of distilled water. So that's around $0.90 in ingredients, not counting the film which was practically free (I think I paid about $0.03/ft). To compare, the same amount of Adonal 1:100 would cost about $0.14. So this isn't really a money saving proposition, especially if you consider the time spent collecting, grinding, steeping and weighing. It is more about the adventure of making something that works. It is closely related to the "maker" movement you see in places like the Maker Faire and Make magazine. It lets us explore our creativity while still engaging our left-brained nature.

Monday, December 15, 2014

The Flying Leatherneck Aviation Museum

Ever since I was a little kid, I loved airplanes. The thought of flying was the most thrilling thing I could think of. In 1976 when I was 9, a show came on TV called Baa Baa Black Sheep. It was about Marine Attack Squadron 214, AKA The Black Sheep Squadron. This was a squadron of 8 F4U Corsairs, which immediately became my favorite fighter. I guess it still is. I love the look of the plane. The inverted gull wings and the enormous engine make it so unique and in fact proved to be a formidable fighting machine, serving from 1942 - 1953. But I really just like planes in general, so when I get the chance, I drive a couple of miles over to MCAS Miramar where the Flying Leatherneck Aviation Museum is. Last week I went over and took my 50's vintage Graflex Speed Graphic with a Graflex Optar 135mm f/4.7 lens and some sheets of Ilford Delta 100 film. The day was cloudy, so exposures were a little tough. Working with a large format camera means you are taking time to do everything and double checking it all before you trip the shutter. On days when clouds are covering and uncovering the sun every 30-60 seconds, that's a problem. So I just took an average reading and figured I would stand develop the film and that would correct for overs and unders. So here are the pics from my day at the Flying Leatherneck Museum.

Leatherneck 7 Leatherneck-8 Leatherneck-9 Leatherneck-4 Leatherneck-2 Leatherneck-5

Monday, June 9, 2014

Balboa Park

I took a break from camera repair one weekend to take my oldest son to the High School Student Shakespeare Festival here in San Diego at Balboa Park. Of course most of my time was spent watching young people perform scenes and monologues, but there was a bit of down time in between things and then waiting for winners to be announced. So I took the opportunity to use the Yashica Electro 35 GSN I had loaded up with Expired (2011) Neopan SS. There are probably more opportunities for 'street' photography there in the park than you could shake a rangefinder at, but I'm not much for photographing people. I know, I know... I'm working on it, but very slowly. So while avoiding the crowds, I took a few shots of some of the amazing architecture we have in this 100 year old park.

This is 'the Prado'


This is the Botanical Building and reflecting pool. I have some thoughts on the composition of this photo that I might share in another post.


A detail of this Botanical Building dome.


Here is another common sight at Balboa Park. Many artists comer here and paint, photograph, draw, dance, make music, perform, etc. So aside from the 17 museums, 9 performing arts venues, 19 gardens, and so much more, there are sidewalk artists everywhere to just enjoy.

I hope that if you are ever in Southern California that you will stop by Balboa Park and see why San Diegans love it so much.

Tech Notes:

  • Film was exposed at EI 100 on a bright sunny day
  • Development was done in Caffenol-CL, standing for 70min
  • Epson V600 scanner
  • Dust spotting in PS CS5.5

Tuesday, April 22, 2014

Springtime in San Diego

Here in San Diego, California we have two seasons. There is Warm Summer and Hot Summer. Right now we are still in Warm Summer as it is late April and Hot Summer doesn't really get here until late July. But I know that Hot Summer is coming because the Coral Trees are in bloom.

I took this photo with my Graflex Speed Graphic using the Optar 135, F/4.7 lens. I shot it on Kodak Clinic Select Green x-ray film and developed in 1:100 Adonal for 4.5 min standing. I hope you are enjoying the change of seasons where you are.

Wednesday, April 16, 2014

Dacomatic Recordak Film

I have been playing around with expired film recently. This is for a couple of reasons. First, it is economical and I am cheap. ;) Second, and more importantly, I like the look of grainy film. I wouldn't say that I am in the "more grain is better ad infinitum" camp, but I like photos with pronounced grain. In fact, back when I was shooting digital, I would often use grain 'filters' or plug-ins for my photos that needed that extra something. Looking back now, I am surprised that it took me so long to return to film photography, when that is what I wanted my photos to look like all along. As film ages, the ionic silver undergoes subtle chemical changes. The crystals merge and aggregate, cosmic rays and other radiation can 'expose' some crystals, etc. So the net effect is that the film speed (iso rating) gets lower, the grain gets bigger and the base fog becomes more noticeable. Some of this can be overcome when you develop your film if you are trying to get a 'cleaner' look from your expired film. I use one of two developers (Rodinal or Caffenol-CL), neither of which is very good at compensating for these side effects of elderly film. So I shoot the film and live with what I get, which is usually pretty close if not exactly the look I am going for.

Recently, I acquired a 400 foot roll of some well-expired 35mm film. It is Kodak Dacomatic A film, expired in Dec. 1973. I was only 6 years old when this expired!! I bought it on the big auction site and then started trying to figure out what iso it should be shot at and how in the world to develop it. Guess what, there's not much information out there on this film. From what I can gather it was made for use in the Kodak Recordak machine which was used for copying documents. Okay, so it's copy film. That will mean that it is probably high contrast, or at least it was in 1973. I did find one guy on Flickr that had used it and shot it at iso 6. Over on the FilmWasters forum (highly recommended) one of the guys wrote a desktop application that will calculate a reasonably accurate EI for expired film. You can download it HERE. Download those three files and run setup.exe. This application predicts an iso of 6 for film that was originally iso 100. Was that the original speed?? Who knows? Never being one for following rules, or even guidelines, I set my meter to iso 12 just to allow a little more reasonable shutter speeds. I should note that subsequently, another Filmwaster has exposed this same film at iso 80 and got very good results using Blufire HR developer from the Frugal Photographer. Anyway, I rolled some up in a reusable film canister. I had to do this in the dark since my daylight film loader will not hold a 400' roll. So I measured a piece of string as long as a 12-exposure roll of film and taped it to the counter in my darkroom (bathroom). Then I turned out the lights and measured out a piece of film as long as the string. I then taped that to the film spool and rolled it up. I threw this into my trusty old Nikkormat FTn and went out in the sun to find something to shoot. I found myself at The Scripps UCSD Medical Center where they have sculptures and fountains and buildings that might be photogenic.


Here are a couple of shots I took of a marble sculpture of a pair of robed figures looking at each other.

I developed in Caffenol-CL for 60min with no agitation after the first 30sec. You can see that the grain is 'pronounced', but not what I would call 'extreme' or distracting. This is the look I like and why I like to use expired film. Different films age in different ways and storage conditions play a big part in whether they are usable or not. If you are buying very old film (more than 5yrs past expiration) you probably want to verify with the seller that it was in cold storage. You may get an image out of film stored in a closet, but it will be pretty faint. Just experiment and have fun with these old stocks!

Saturday, March 29, 2014

Bromide Streaks

"Bromide streaks?"
"Why yes... yes it does."
""They should arrest it for public indecency!!"

Okay, that's a terrible joke. The truth is that if you aren't careful with your development, you could get some ghastly, ghostly streaks on your negatives. Bromide streaks, also known as bromide drag is described best by some unknown source I found on the "internet".

The developer near the heavily exposed areas of the film becomes exhausted in the process of reducing silver salts to silver. Bromide ions are also produced in this process, and being heavier than the developer, they drag downward across the surface of the film, inhibiting development in those areas and leaving streaks of uneven development, called "bromide drag" aka bromide streaking. Agitation during development brings fresh developer to all areas of the film and flushes away the bromide by turbulence within the developer."

This tends to show up for me especially on 35mm film that is developed using "stand development" (long development in dilute developers with very little agitation). It seems that the borders where the sprocket holes are provide the perfect conditions for bromide streaks. Combine that with a low contrast area of the image and you will notice the streaks of over/under development. These two photos I took at my local filling station show bromides streaks at the tops.


The solution to this problem is to choose a development method with more agitation, or use a tank that you can flip over and set down every few minutes or so. That would prevent the bromide from "sinking". So don't let bromide be a drag. Keep experimenting and you'll figure out a solution. If you have experience with this, please share it down in the comments.

Friday, March 28, 2014

Transitioning Off Of Flickr

Looking back, I can see that it was inevitable. Flickr started making massive and dramatic changes to their site maybe around a year ago. At first they called it a 'Beta' and you could opt in or out. There was a seemingly huge backlash and people were writing scathing reviews on the photo forums and in the Flickr groups. Many people left at that point and found alternate places to host their photos. I tried to work with the Beta for a while, but eventually got fed up and tired of being frustrated, so I switched back to the older version of the user interface. I figured that Flickr would hear the outcry and modify their plans to change things so drastically. It was sort of 'out of sight, out of mind' for a few months, but early this week, they switched everyone over to the 'new' interface. No warning, no choice, and it was just as bad as I remembered. Additionally, my account is experiencing a bug so that I can only embed the original size photo here in my blog or on the forums where I like to share. Well, that is the proverbial straw that has broken the camel's back. I will not be loading photos on to Flickr and I have cancelled my 'Pro' account. I am going to give iPernity a try and see how things work over there. I did encounter one serious limitation initially, but have subsequently figured out a work around for it.

The problem was that I didn't want to jump into a paid 'Club' account right away. That meant that I did not have the functionality to get the embed code in html or bbcode so that I could share photos on my blog or the forums. I couldn't even get the url of a photo by the usual right-click -> Copy image url. It was completely blocked (as it is for all of their 'free account' users)! Now that seems a little dirty to me. The whole reason for using an image hosting site is to share your photos elsewhere. At least that is my primary use case. So what to do? Try another host like pBase or Photobucket? I didn't really feel like trolling around looking for the one image host that 'has it all', and I knew that many of my contacts from Flickr had moved to iPernity. As with many things in life Google has the solution! I generally use Chrome to browse the interwebz. I also have the benefit of being a bit of a computer nerd and have done some web development. So I thought I would just give the old CSS inspector a look to see if there was anything helpful there. Right click on the image and select "Inspect Element". Make sure that the "Elements" tab is selected at the top of the window that pops up at the bottom of your browser. There you will see a bunch of code. This is the cascading style sheet that controls what everything on a web page looks like (colors, fonts, layout, etc.). Right there on the highlighted line is the url (web address) for the image! BAM! Just what I was looking for! Now I can use that url to link directly to my photo. For the blog, I use html tags like this:
<img>http://u1.ipernity.com/41/63/61/31446361.32e384e1.640.jpg?r1</img>

For online forums, I use bbcode like this:
[img]http://u1.ipernity.com/41/63/61/31446361.32e384e1.640.jpg?r1[/img]

If I want a different size, I just select that size on iPernity so that I am viewing it and repeat the right click inspect element step. Then I have the url for that size image. Easy Peasy!!

I hope you find this helpful especially if you are migrating away from Flickr like I am and want to try iPernity for free for a while. Here is a photo from the first roll out of my 'new' Yashica Electro 35 GSN. This is a rangefinder camera from the mid-70's that was mass produced. They are super easy to get in good-ish condition. They do have some inherent issues, but if you aren't afraid to get your hands a little dirty, and open up a camera you probably paid less than $30US for, then it is a no-brainer. Just go get one. They come with a pretty darn good lens, the 45mm Yashinon 1:1.7. That's right, a nice sharp, clear, contrasty f/1.7 on a cheap camera. I shot this photo on some old Ilford FP4 that had expired back in 1981, so it is a little grainy, but over all I like the look.

Tuesday, March 25, 2014

Pushing Through XII

Wow, it's been a while since I've done one of these. This one is a root of a Ficus benjamina tree. If you live somewhere that these trees grow then you know what the roots do. They creep along the ground just under the surface and then they start to grow so that they break the surface and anything that has been built on it. That means that concrete sidewalks, barriers, foundations, etc. are all going to break. These are the trees that are going to be the rock smashers that level the cities after humanity has extinguished itself. For now though, they are an inconvenient beauty that decorates our landscape.

Pushing Through XII

Tuesday, December 24, 2013

2 Cameras, 2 Films, 1 Subject

I didn't really take these two photos with a blog post in mind, but I ended up scanning the films together and so the comparison was inevitable.

The first was taken with a c. 1939 Agfa PD16 Clipper. I wrote about this camera recently, so click the link to find out more about it. The film is expired (1981) Tri-X, so I expected some grain. I took the photo indoors near a bright-ish window, but still it was under-exposed for sure (probably f/5.6 at about 1/40th). The processing was done in Adonal diluted 1+100 with semi stand agitation (10 sec init and 10sec at 35min) for 70 minutes. That should have brought the grain under control a little, but I think the other factors were overpowering. The grain is "pronounced" to say the least. The contrast is low, the DOF is not bad, but I am a little too close to the subject, so it is soft. These work to emphasize the grain. So what I ended up with was a photo that looks very old indeed. I think the treatment actually works with this subject, so I am happy to share it.

The next one was taken with my trusty old (c. 1967) Nikkormat FTn with the awesome Nikkor 50mm f/1.4 lens. This lens has great clarity and contrast and takes pretty sharp photos if I do my part and hit the focus correctly. Development was identical to the image above, but the film was slower. Initially it was some generic "Professional Film" rated at asa (iso) 125. Being that it expired in 1981, I rated it at iso 50 and hoped for the best. I will definitely be posting some more photos from this film since I have 100 ft of it. It turned out quite nice, I think. Everything I would expect from this camera/lens and good film. There may be a bit more grain than it would have had 30 years ago, but it is nowhere near as pronounced as with the Tri-X above that expired in the same year.

I hope you have a wonderful Christmas. If you were nice, maybe Santa will put some expired film in your stocking!

Wednesday, September 25, 2013

Ornamental Shrubbery

Berries
I took this photo with my '51 Graflex Speed Graphic camera. I was walking around with it hand-held, which I don't do very much because it is heavy and my eyes aren't always good enough to use the range finder effectively. So usually, I tripod up and focus on the ground glass. This day though, was bright and the sun was just starting to get a little angular, so the shadows were good, but there was still enough light to see the overlapping images in the range finder. I shot this at f/8 x 1/200 sec on Kodak CSG x-ray film rated at iso 80. I developed the film in Adox Adonal (Rodinal) 1+100 for 4.5 min in a Patterson tank with a MOD 54 film holder. I scanned the negative at 2400 dpi with an Epson V600, taking two passes and stitching the two scans in Photoshop.

WHAT!!?? 2400 dpi?? Yes, I had the scanner set that way because I had been scanning some 6x6 photos from an engagement shoot I did earlier in the week. I didn't notice until I saw how long the first scan was taking and by then, I thought what the heck, just let it go at 2400. When you scan a 4x5 negative at 2400 dpi, you get about 115 megapixels. That is a huge image and really unnecessary unless you are doing billboard work. But I had it anyway and didn't feel like tossing it and re-scanning (note to self: next time toss it and re-scan it). The problem with such an enormous image comes when you go to load it up in Photoshop to do some dust spotting with the healing tool. At 2400 dpi every single microscopic spec of dust is visible (note my screen resolution is only 1366x768) and with a 15px brush, that takes a LOOOOOONG time to go over and click each speck and hair. Save yourself some trouble and scan at 800 or 1200 dpi for normal sized prints.

The very cool thing about these berries is that they are now just sort of yellowish green, but once "winter" comes to San Diego and things get really dry, they turn bright yellow and they pop open along the seams. Inside is sort of a shiny, creamy white with three bright red seeds inside. It is really beautiful. I will try to get some photos this year and post them here to follow this up.

Anyway, I hope you enjoy the photo. I think it came out well.

Sunday, August 25, 2013

Pushing Through VII

See Pushing Through for an explanation of the series.
Pushing-Through-VII

Pushing Through VI

See Pushing Through for an explanation of the series.
Pushing-Through-VI

Pushing Through V

See Pushing Through for an explanation of the series.
Pushing-Through-V

Pushing Through IV

See Pushing Through for an explanation of the series.
Pushing-Through-IV

Pushing Through III

At first glance, this looks pretty common. It's just a plant growing up through a gap in the sidewalk. But if you look a little closer, you'll see what attracted me to this particular one. First, behind the plant you can see that "they" have tried to seal up the gap with asphalt. This plant is growing in defiance of not only the sidewalk itself, but the added effort to keep nature at bay. The next thing to notice is that in fact the entire section of the concrete sidewalk is being pushed up from beneath. This is probably caused by a tree root. The roots push up and crack the concrete, then seeds get blown in and there they start to grow. I often try to imagine what things will look like in 200 years. Will man have truly mastered his environment so that his walkways are no longer damaged and 'littered' with these interlopers? Or will the plants continue to struggle and push through the concrete, reminding us that we are the intruders here? We are the ones struggling against nature. We are fighting on the side destined for failure. I want to think that we can come to some form of a 'truce' where man can allow more nature into his urban environment.

Pushing-Through-III
I took this photo with my Yashica Mat 124G, using Kodak T-Max 100 film. Development was in Caffenol-CL with 70min stand development. Scanned with an Epson Perfection V600. See Pushing Through for an explanation of the series.

Sunday, August 4, 2013

Cousins

I didn't really have cousins growing up. I have one cousin that I didn't meet until I was 15 or so and then only saw him a couple of times. I had loads of second cousins, but only saw them on rare occasions. Unfortunately, my kids are in a similar boat. They have cousins, but they all live in different places around the country, so they don't see each other much. The wonderful phenomenon about young people is that they pick up right where they left off like it was yesterday. We recently had an opportunity to get one whole side of the family together. The cousins all jumped right in to playing and harassing each other like, well... like family. It is a lesson we all could learn, not to hold petty grievances and hurts from years past, but just to love and enjoy one another like kids do... like cousins do. Cousins
I took this photo with my Graflex Speed Graphic 4x5. This is the first photo I took with this hand-held as opposed to using a tripod. It is heavy and sort of unwieldy, but I had the light metered already and the shutter and aperture were all set. I just had to focus and shoot. I used the built-in range finder, lined up the two images and "click". It is kind of hard to go unnoticed with a monster like the Speed Graphic in front of your face, but in this case only one of my victims er... subjects noticed and looked over. The others were busy being kids, so I got a pretty candid shot of them being themselves. I didn't take enough care sealing up my darkroom (bathroom) when I unloaded the film holders, so it looks like there was a bit of a light leak in the lower corner. I did a little dodging in Photoshop, so it's not quite as noticeable. I will probably crop it out if I decide to print it. That is one of the beautiful things about large format. There are plenty of pixels for cropping before printing. The development was done in Caffenol-CL for 70 minutes. I like the look of Caffenol-CL with a number of different films. Being fairly inexpensive and environmentally friendly makes up for the hassle of weighing and mixing ingredients. I hope you enjoy this photo. Maybe it reminds you of summers with your cousins.

Friday, August 2, 2013

Pushing Through II

Pushing Through II
This photo was taken nearby where I work along the street. You can see the fence in the background. On the other side of that fence there are trees and shrubberies, but it is a hillside, so it is not groomed or manicured in any way. This sort of 'wild' growth tends to send out root runners just under the surface of the ground and in this case under the pavement of the sidewalk. Then it finds a crack where moisture and light come through and it pushes up. You can see in this photo that the larger underground root has pushed the cement block up and away from the sidewalk, creating the 'crack'. I often wonder, "What will this place look like in 100 years, in 500 years?". I wonder if man will perfect the supression of these 'invasive' plants and have perfectly paved walkways with perfect 90-degree angles and none of this messiness. Or will man come to grips with his place in the world and welcome the wild back into his path. Will our cities become more natural or more manufactured? Time will tell I guess. Until it does, I will enjoy the struggle of these little ones pushing through.
Pushing Through I