Monday, December 15, 2014

The Flying Leatherneck Aviation Museum

Ever since I was a little kid, I loved airplanes. The thought of flying was the most thrilling thing I could think of. In 1976 when I was 9, a show came on TV called Baa Baa Black Sheep. It was about Marine Attack Squadron 214, AKA The Black Sheep Squadron. This was a squadron of 8 F4U Corsairs, which immediately became my favorite fighter. I guess it still is. I love the look of the plane. The inverted gull wings and the enormous engine make it so unique and in fact proved to be a formidable fighting machine, serving from 1942 - 1953. But I really just like planes in general, so when I get the chance, I drive a couple of miles over to MCAS Miramar where the Flying Leatherneck Aviation Museum is. Last week I went over and took my 50's vintage Graflex Speed Graphic with a Graflex Optar 135mm f/4.7 lens and some sheets of Ilford Delta 100 film. The day was cloudy, so exposures were a little tough. Working with a large format camera means you are taking time to do everything and double checking it all before you trip the shutter. On days when clouds are covering and uncovering the sun every 30-60 seconds, that's a problem. So I just took an average reading and figured I would stand develop the film and that would correct for overs and unders. So here are the pics from my day at the Flying Leatherneck Museum.

Leatherneck 7 Leatherneck-8 Leatherneck-9 Leatherneck-4 Leatherneck-2 Leatherneck-5

Saturday, November 8, 2014

Perforating 126 Film II

I thought I would follow up with a little bit of what I've learned after using the perforating rig on two rolls and running them through the Kodak Instamatic 500.

First, there is a little bit of room in the rig, so the film can slip down maybe a mm or two and the holes end up being up on the edge of the film. That makes them too high for the shutter reset pin to engage. Here is a pic of the shutter reset pin in the camera.

And here is one of the film I perforated.

The two strips on the bottom are the first roll I did and after I only got 5 shots for 12 perforations, I was more careful about lining up the second roll with the top edge of the perforating jig. That one did much better and I got 10 shots on that one. The ones that missed were still up at the top edge. I attribute this to the 'wiggle room' I mentioned before and also to the fact that the holes are hard to find in the cardboard in the dark. Also the paper hole punch is a little difficult to manage in the dark because I have to get the cardboard and the film into the punch where it is designed for only a piece of paper to go.

The next steps are to cut a new jig out of 1/16 inch acrylic and possibly purchase a hollow leather hole punch to make the holes in the film. That would be simpler because I would just have to get the end of the punch into the existing hole in the jig and turn with a little pressure to punch out the film.

One last issue is frame spacing. I used an old roll of 126 film to position the holes in the jig, but the holes in the film are oblong, so I just aimed for the center. That made the images on the film come out right next to each other without any spacing between. I will adjust the distance between the holes and see if that problem doesn't go away. Stay tuned.

Here are a few shots I took with this film. It is Konica brand color negative film which I shot at its box speed of 160. It came out with a purple cast, which is not the end of the world, but I might lower the speed and see what it does. Also, my C-41 chemistry is WAAAY past the manufacturer's recommended roll count, so I will mix up a new batch.

instamatic-007
instamatic-006
instamatic-015

Friday, October 31, 2014

Perforating 126 Film

A while back, I got the idea that I wanted an Instamatic camera. Why would I want an archaic camera for which film is nigh impossible to find? In fact, the only place to find "new" 126 format film is at the Frugal Photographer with an anything but frugal price tag of $25/roll! That's over a dollar a shot for what is essentially 35mm film in a fancy cartridge. The fortunate part of this is that 126 film is, well... essentially 35mm film in a fancy cartridge. That means that (according to the Google) you should be able to manually load the 35mm film of your choice into an empty 126 cartridge and be on your way. Well, yes and no. Most of the instamatic format cameras were quite simple with fixed focus, single aperture, single shutter speed lenses. The winding mechanism worked on the principle that there was a single perforation along the top edge of each exposure, so as you wind the film, a pin in the camera pokes through that single perforation and stops the winding mechanism until the shutter is tripped. Well, 35mm film has 8 sprocket holes for each (24x36) exposure, so that pin no longer works for spacing. The 'work around' most instamatic cameras allow is that you fire the shutter for your picture, then you hold the shutter release button down again when you wind the film and instead of the camera telling you where to stop, you guess and by trial and error, you figure out how many actuations of the winding lever you need to make the right frame spacing. Unfortunately, the camera I have is a Kodak Instamatic 500. I say "unfortunately" not because I don't like the camera. Quite the opposite. This camera has full manual control of a good quality lens and shutter. However, it does not allow the "hold down the button" trick to work. Once the shutter is fired, the pin is up. If you have 35mm film in the cartridge, you have to try to power through the sprocket holes (note: forcing dials, knobs, and levers on a camera is never a good idea). So what to do with a perfectly working camera that is impractical to use with current film?? The only rational thing I could think to do is to make my own 126 film.

There are a couple of options here. First would be to use some sort of tape to cover the unwanted perforations in current 35mm stock. It would have to be done in the dark and working with sticky tape and film in the dark is just a recipe for disaster and frustration. The other option is to buy unperforated 35mm film and make the perforations myself. Again, it will have to be done in the dark, but a hole punch is a lot easier to deal with than sticky tape (I think). The trick then is figuring out where to punch the holes in a reasonably accurate way and then lining them up with corresponding holes in the backing paper (should you choose to use it). The answer is to use a 'jig' that will guide the hole punch to the right places. First, I made a prototype with cardboard. I used an existing authentic roll of old 126 film as a guide to put the holes in the right places.

The two pieces fold together to 'sandwich' the film, holding it steady with some bulldog clips. Here is a picture of the jig with film loaded.

The first time I tried punching the holes with my eyes closed, I accidentally punched an extra hole. When I make the real jig with acrylic sheet, that won't happen because the hand held hole punch won't be strong enough to punch new holes. It will just punch through the pre-drilled holes through the film. Otherwise, it worked perfectly and the film holes lined up with the paper holes.

Getting the film positioned correctly on the backing paper in the dark is a little tricky, but usually I will put a crease in the paper where the film end is to be taped down. Also, the holes in the backing paper are sort of oblong, so there is some tolerance for misalignment. The alternative is to tape the film to the paper first and then punch the holes through both at the same time. Then alignment is pretty much assured.

I have yet to test this in-camera, but I am hopeful that I will be able to use this unperforated film to get this camera running. I will update soon with results.

Update: Go see PART II.

Monday, October 20, 2014

Motion Picture Film

Ever since Cinestill hit the market, shooting movie film in still cameras has become all the rage. Not being one to miss a passing bandwagon, I thought I would jump on and see where the ride went. However, being err... "thrifty", I did not want to pay $10/roll + s/h for 35mm film. Also, I seem to have a good thing going with expired film, so why fix what doesn't seem to be broken? With that philosophy in mind, I went searching for the cheapest movie film I could find on a reasonably sized (<400ft) roll. I want to try it, not shoot it exclusively for the next 10 years. I looked at a LOT of different sellers and emulsion numbers. I also started researching the "remjet" issue. I would have to get that layer of black gunk off the back of the film either before shooting it ("premoval") or after exposing, but before developing. The remjet layer is there for anti-halation as well as anti-static for when the film is whizzing through a motion picture camera. Anti-halation is nice and most still films have a layer of dye on the back of the film to keep light from reflecting off of the pressure plate inside the camera and making glowing "halo's" in the highlights on the film. Premoving the remjet will eliminate this benefit, but if you are going to send the film off for processing, it has to be done. The machines that process film will not remove it and when it comes off in the machine's chemistry and mechanics, the operator will be unhappy with you. Cinestill removes the remjet for you, so that is part of the price you pay (which is fair, but for me unnecessary since I dev my own C-41). So what did I do?? I did both premoval and nothing. Keep reading and I'll explain.

I rolled up one 12-exp roll just like I would for any other bulk film. This will be the "control" sample and I will not do anything special to it regarding the remjet. The other roll, I measured the length and spooled it onto a Paterson developing spool and put it in the tank for 15min with a solution of 2Tbs Borax in 500mL water. At the end of 15min, I agitated the tank vigorously for about a minute. I really shook it hard. Disappointingly, the liquid that came out was just sort of a weak greenish solution. Subsequent rinses were clear. There was no sign of black flakes, so either, my solution did nothing to remove the remjet, or the remjet was really thin. A third option is that there is no remjet on this film. I'm not sure what remjet looks like, so I can't say, but the film is Super F-Series which does appear to have a remjet backing according to the interwebz. So at this point, I just dried the film in a 'dark' place and rolled it up into a canister. Here is what the two treatments look like side by side. The premoval roll is on the left and the untreated roll is on the right. There is clearly a difference between them, but is it remjet or just anti-halation dye?

I shot both rolls at iso 400 in the same camera, mostly in cloudy daylight. For this test, I'm not so much interested in color rendition as much as just the processing workflow. I fully expected to see some black bits stuck to the film and/or floating in my developer. The developer came out clear as always, so I figured the remjet must still be stuck fast to the film and I would have to do a removal at the end. To my surprise though the film was clear. The two films were developed in the same tank at the same time and I couldn't tell which was which until I looked at the specific images. There was no sign of remjet anywhere. Here are a couple of images from the "control" roll that was not pre-treated. I scanned these on an Epson Perfection V600 using the auto color correction, but nothing else in post. The color is shifted/cast a little as you might expect with cross processing, but other than that, there is nothing notable. The grain is there and looks about how my other expired color films look, so that's that.

Fujifilm 8572 Fujifilm 8572

Here are a couple of shots from the premoval roll. It looks like the film got fogged during the drying process. I did my best to keep it absolutely dark, but probably failed to some degree. There also seems to be some damage to the film. This is either chemical from the borax or mechanical from the vigorous shaking. Hard to say without more testing. Having said that, I will probably not do any more tests since the untreated roll came out nice without any ill effects from the remjet. I will just shoot this like any other color negative film.

Fujifilm 8572 Premoval Fujifilm 8572 Premoval

Monday, October 6, 2014

Flash Bulb Magic

I shot a wedding last weekend for two dear friends. The days before the wedding were fraught with the anxiety of shooting a wedding and what gear to take. The DSLR went with a short prime telephoto and the bride lent me her better-than-mine DSLR with a medium telephoto. So that covered the "safe" option. I would get all of the photos that I "expect" from myself when shooting a wedding. Now... what to take to get the photos that I "desire"? 35mm format is covered by the digicams, so I left the 35mm film cameras at home. If I was going to carry the weight, I should make it count. Medium format: Yashica Mat 124G (I only took 2 or 3 with that) and Brownie Hawkeye Flash Model (I think I only took one with that). The sanctuary was pretty dim, so the film I generally shoot with was too slow for moving subjects. You think that people getting married are just up front standing still, but they aren't. They are fidgeting and looking at each other and then at the pastor and then they go light candles, etc etc. After the ceremony, I did all of the formal family & friends photos, again mostly digital, but I did keep one surprise in reserve. The Graflex Speed Graphic! I brought this monster out to the enthusiastic "oooh's" and "aaaaah's" of the expectant crowd (okay, that may be a bit hyperbolic). Pose; meter; focus; aperture; focus; meter; aperture; dark slide out; cock shutter; focus; "One-Two-Three---CLICK"; dark slide in.

Portrait1

If Kodak Tri-X 320 was a food, it would be butter. I developed this in Adox Adonal 1:100 for 70min with agitation at 0 and 35min. You might think I did a lot of correcting in post after scanning, but you would be wrong... dead wrong. Now get your things and get off of my blog! Just kidding. You should stay for the rest. It's going to get good. I promise.

I took another just like that one for safety (good thing too). Then it was off to the reception. It was a small room in an Italian restaurant in La Jolla, CA. I did what I could with the DSLR, but the flash was just making me cranky. I had it dialed down to -2.0, with a cup diffuser, bouncing off the walls and ceiling. Everything short of a soft box to get some light but minimize the shadows. They turned out okay, but I am so used to film, the digital rendering of the scene was just missing something. Out comes the Speed Graphic, along with the flash and 7-inch reflector. I loaded up with Tri-X again and popped in a GE #5 bulb. I had done the calculation the day before. Iso 320, Guide Number at 1/100 sec is 300, that makes if f/30 for a subject 10 feet away. I decided to open it half a stop and hoped that the highlights wouldn't get blasted. Expose for the shadows, develop for the highlights, right? Now there's something about flashbulbs. First, the 7-inch reflector is mirror polished and makes a BIG cone of light that is hot in the middle and falls off at the edges. Also, it flashes over time. It seems instantaneous, but over the life of the bulg, it is starting out dim and soft, then ramping up to full power, then falling off. Depending on where in that cycle the shutter opens, there will be a dramatic difference in the look of your photo. Generally though, the light is on the soft side (for a direct flash) and hot in the middle. The shadows are there, but they aren't the harsh outlines you are used to seeing. So take a look at these two photos I shot at night in a very dim restaurant and tell me there isn't something magic about this flash and camera.

Reception1

Reception2

Sunday, September 7, 2014

Rookie Mistake

I developed some film this weekend. Two rolls of 35mm film went into my Patterson tank along with 500 mL of 1:100 Adonal. Did you catch that? I didn't until I took the developed film out of the spool to hang dry. And there it was... a strip of undeveloped (clear) film along the entire length of the film. I knew immediately what had happened because I had done this before. There had not been enough developer in the tank to cover the top of the reel! What!? I was sure that 500 mL was enough to cover 2x35mm rolls. So I looked at the bottom of the developing tank where there is embossed the volumes for different film types. I was certain I would see 1x35mm - 250 mL, but I didn't. It was 290 mL for each roll. So there you have it. Just a short entry this time to share this cautionary tale. Always read the instructions. Take nothing for granted.

Sunday, August 31, 2014

Exif Data

Since the beginning of photography, artists have recorded information about their camera, emulsion and exposure. Historically, this was done with pen and paper. I myself have used the archaic method of capturing this 'metadata'.

Indeed there are companies who will sell specialized notebooks just for this purpose. These are very handy and if you like the full analog experience, I highly recommend getting one of these to record your photo details.

For those who shoot digital photos, there is an automatic convenience feature called "exif". This stands for Exchangeable Image File Format. Really, the feature is the "tags" or "metadata" that gets captured and encoded with the image data. These are things like make and model of the camera and lens, focal length, exposure time, iso setting, date/time, etc. In cameras with gps (like smartphones) you even get location data. Now that all seems really cool, but I have to admit that when I shoot digital, I don't care about any of that. I shoot RAW so I have 3 stops of data built in. I can chimp to my heart's delight, so I don't have to accept any bad exposures. There just isn't really any use in my workflow for all of the exif data. On the other hand, when I shoot analog (film) I often want to know which camera I used, what the emulsion was and possibly exposure details. This is because when I go to scan the photos and I have a bad exposure (or a particularly good one), or if I was using an unusual type of film, those details can come in handy for correcting mistakes and not making them again. So how do I get the exif for my film photos? Well, we are in the 21st century after all. There must be "an app for that"... and there is.

I am an Andriod user, and in the Google Play store, there is an app called Exif4Film. Actually it's a pair of apps. One for your phone and one for the computer you use for scanning your film. The phone app allows you to enter your equipment (cameras & lenses). Then you add a roll of film and assign the camera/lens you are using. For each shot you take, you add a shot to the roll in the app. It also records the time/date and location from your phone. You also have the option of taking a 'reference photo' with your phone's camera. At the end of the roll, you upload the data to Drop Box (yes you will need a Drop Box account). Then when you scan the photos, you tell the desktop application which file in your Drop Box location goes with those photos. It lets you match which image file goes with which exif entry. That's it! Now your scans have the exif data you recorded when you took the photo. Cool, huh? Ok, it's a bit more work than pressing a button, but it gets the job done and now you don't need to go try to find the data back in the pages of your notebook. I think it is a very nice app and well worth the price. Oh, did I mention that it's free? Give it a try and see if it fits into your analog workflow.

Saturday, August 30, 2014

Brownie Hawkeye Flash Model

I like Bakelite. There, I said it. Specifically I like Bakelite cameras, but radios, jewelry, you name it. At one time it was probably made out of Bakelite. For the youngsters who might be reading this, Bakelite was the first synthetic plastic. I recently acquired a 11953 Kodak Brownie Hawkeye Flash Model (made with Bakelite) from the local Goodwill. I went to pick it up after winning the auction and the young man there lifted it out of the box and didn't notice that the back was not latched to the front. In his defense, he has probably never held, let alone used a camera that wasn't also a mobile phone, so why would he think to be careful about latching the front and back together? The back fell about 4 feet to the concrete floor. A modern plastic would have cracked if not shattered, but the Bakelite took it like a man and just bounced a little. I picked it up, reassured my intrepid assistant that it was fine and put the two halves of the camera together, making sure the latch was fastened. It looked like it had been sitting in an attic for 50 years (which is fairly likely), but the shutter was working and all of the transparent parts were intact. So I took it home and after loosening the 6 screws that hold it all together, started cleaning. For Bakelite, I haven't found anything much better than Flitz for cleaning. It is like toothpaste for plastic and metal. Instead of a brush, I used a paper towel and inside of 30 min, the Bakelite was shining like brand new!


1953 Brownie Hawkeye Flash Model

The lenses and mirror took a little soapy water and they were perfect as well. The lens is a single element plastic meniscus lens. So one side is convex and one side is concave. Normally, the convex side goes inward toward the film and that focuses from about 5 feet to around 15 feet. While I was putting it back together, I thought I would flip the lens backwards (this is a common thing to do with these cameras). That causes the lens to focus from about 3 feet to infinity, but only in the center. The edges are thrown into immediate blur. This has a similar effect to vignetting. It draws the viewer's attention to the center of the frame. It is a compositional tool. Especially in square format cameras, which this is, centering your subject is not a 'no no' like it is in rectangular formats. So if you are planning on taking photos where the subject is centered, this might be a good camera to have on hand. It is all fixed (focus, aperture, shutter speed), so the only way to get the right exposures is to choose the right film for the expected light level. I chose expired Tri-X 400 which is nominally iso 200, so works well for sun or shade. Indoors, I would probably have to attach the flash unit (which came with it) and use flash bulbs. Tri-X will push to 3200 or so, but with expired film, the grain is already pronounced, so a 4-stop push is well... pushing it.

Here are a couple photos I took with it.


hawkeye-004
hawkeye-001

Worth noting is that this camera takes 620 film. Google it and find out how to respool regular 120 film onto a 620 spool. You will have to do that in order to use this camera. Don't worry, every one of these I have seen has an empty 620 spool in it. Have fun with these old Bakelite cameras. They will probably outlast us all.

Saturday, August 23, 2014

That's Just Crazy

I traded some film with another Filmwaster. I sent him some expired FP4 and he sent me some expired Ektachrome 64 Daylight. He had exposed a roll and cross-processed it and didn't like the results, but I thought it was kind if cool. It had this blue/green color cast that was unique. I instantly thought that a little red would 'balance' things and add some contrast. Redscale would certainly do that. What's redscale? That's when the film is in the camera the 'wrong' way so that the emulsion side is facing the back and the light is passing through the base material first and the emulsion layers in the reverse of the intended order. It generally makes things look like you have shot them through a red filter, but with some color balancing magic, you can get some really cool effects. So I went into the darkened bathroom at my house and pulled the film out of its canister. I then clipped it off at the end, flipped it over and taped it back on the stub hanging out of the canister. Then I wound it back into the canister and trimmed the leader so that it would fit into the takeup spool of my '65 Nikkormat FTn. These shots were all taken with the Nikkor 50mm f/1.4 lens. The first part of the roll (about 20 exposures) I metered at iso 25. The next 8 shots were at iso 16 and the final 8 were at iso 8. I figured with that scheme, I would at least find out the best speed for this film when 'redscaled'. I developed in a Unicolor C-41 kit that is probably nearing the end of its life (but still good).

Here are a couple of shots from the roll. Head over to my Flicker album to see more.

redscale-029
redscale-016
redscale-013

Saturday, August 16, 2014

Moving Back to Flickr

I know a while back I said I was moving away from Flickr because of all of the changes they were making to their user interface, and I was having some real problems getting links and such. So I went over and used Ipernity for a while. I never joined the "Club", so I had limitations on my account and had to find work-arounds for some things like direct links to photos. It wasn't long before I started creeping up on the 200 image limit and when I saw the end in sight, I needed to make a decision. Either join the "Club" or go back to the less limiting free Flickr account. So after weighing the cost/benefit I decided to return to Flickr, get used to the problematic user interface and get on with sharing photos. It turns out that some of the bugs I was experiencing before had been fixed, so that's nice. I will leave the photos I uploaded to Ipernity over there since I don't want to go figure out where all the links are and change them.

Since I don't like posting without having a photo to show, I will just put this up for your enjoyment. :)

Taken with my Yashica Mat 124 on Kodak Portra 160

Comfy Chair

Friday, August 15, 2014

"-matic" Squared

I picked up a Kodak Instamatic 500 at my local Goodwill via the Goodwill Auction Site. It is a beauty even though the instamatic format was doomed. The film came in plastic cartridges called "126". The film was actually 35mm stock that was perforated differently (one oval perforation per frame) and the images were square. The other difference was that the film was wound in the cartridge with a paper backing like 120 film. This allowed the cartridge and the cameras to have windows in the back where the frame count was viewed (printed on the paper). There are videos online that demonstrate how to spool regular 35mm film into a 126 cartridge, so I won't belabor that here. I took some of my 400' reel of Dakomatic Recordak and taped it to the backing paper (that's not how they do it in the videos, but I thought it was worth a try). The iso is set by a notch in the cartridge, so I couldn't use the internal meter. I hand metered or used Sunny 16 at iso 25. One of the nice things about this camera is that aperture and shutter speed can be set manually. Most other instamatics are full-auto point & shoot types of cameras, but there were a few that gave control to the photographer. One thing I noticed about this camera is that the shutter is for all intents and purposes, silent. I can barely hear it when I am shooting. If I were to shoot from the hip and not hold it up to my eye, my guess is that no one would even know a photo had been taken. The view finder is big and bright with parallax lines for closer subjects. The meter's match needle is at the bottom of the finder and I find that I have to adjust my eye to see it, but unless I am shooting film that matches the notch on the one cartridge I have, I won't be using it. Focusing is by distance estimation in m or ft (range focusing) or by matching little pictures (a la Holga) with the focus mark. The ranges are on the top of the lens and the pictures are on the bottom. I have gotten used to range focusing with my Voigtländer Bessa, so that is the method I use and I am usually close enough. This lens opens up to f/2.8, so I will have to work on my accuracy if I want to shoot those sweet sweet OOF backgrounds.

So here is one of the photos I took. Not super exciting, but it does show the contrast and clarity of the Schneider-Kreuznach Xenar f/2.8 38mm 4-element glass lens. There is also a nice little bit of 'swirl' in the corners that adds a little old school charm to the photo. I think I will be loading this camera more frequently and keeping it handy.

Dacomatic in the Instamatic

Thursday, July 31, 2014

Underexposed Kodalith

I got a couple of rolls of expired (2004?) Kodalith in 35mm from Hungry Mike over on Filmwasters. I threw one into my Nikon N2020 and set the iso to 100. I couldn't remember what iso was recommended to shoot this film and I was too lazy to go look it up. I figured 100 would be in the ballpark and the film probably had enough latitude to compensate if I was under-exposing. Now the other thing I forgot was that Kodalith is a VERY contrasty film to begin with. So if you under-expose/over-develop (push process) you are going to get even MORE contrast. I didn't consider any of these things when I was shooting this film and I guess that I part of my 'experimentation' process. I tend to forget details and then when I get the photos out of the tank/scanner I think to myself, "Well, that's not quite what I had in mind." But then I come back to the photos a week or two later and decide that there is some artistic merit there and even if it wasn't what I had envisioned when I pressed the shutter, I can still appreciate it. So I was doing a 2-3 stop push on this film and many of the shots were just too dark to really make out what the subject is. These two photos however, were composed with enough light/highlights that the image is clear. The increased grain and contrast work in these cases and I have come to like these images. So the lesson here is that 'experimentation' will probably yield something you like and it will definitely teach you something about your art or your process. I'm not one to really hope for "happy accidents". I would rather know what I did, so that I can do it again if I like the results, or not do it again if I don't like them.

Bamboo

Sunflower

Tuesday, July 29, 2014

Pushing Through Addendum

When I wrote the last two Pushing Through articles, I used a couple of photos from one of my favorite cameras; my 1939 Voigtländer Bessa 6x9. I love using that camera and am always wonderfully surprised when I see the results. There is a lot of fuss made about lenses these days. How many elements in how many groups, what kind of coating, rotating or fixed front element, etc. Here's what I have to say about that. Photography is art (unless you are doing scientific or some other kind of strictly documentary photography). The artist needs to use the tools that will give him or her the results that are pleasing to them. If you like tack sharp perfection of contrast and color, then you should stick with modern lenses, preferably high-end ones. I have gone that route and even got caught up in 'pixel peeping' to make sure that my images were just as sharp as they possibly could be with the equipment I had. Then I rediscovered film via the Holga. This 'opened my eyes' to a world of color and shapes and blur and haze that I sort of knew existed, but never thought much about. That little plastic meniscus lens opened doors into creative spaces in my brain that I didn't know were there. Then I started buying old cameras and old film to see where that would lead and it took me deeper into those places. These days, I don't mind taking a shot or two with my DSLR or even on my phone (if required), but when I want to really be creative, I get out an old camera. Maybe it has a really nice lens (for its day), maybe it doesn't. In the case of these photos taken with my Bessa, the lens is a decent 'triplet' type without any coatings. The focus is done by estimation of the distance to the subject and exposure is measured either with a hand-held meter or by 'sunny sixteen'. These are not the sharpest, most contrasty, color accurate photos I could make, but I love the way this camera 'interprets' the light. It fits well with my artistic vision.

These were taken on Kodak Ektar 100 film. I don't shoot this film very often, but it does a very nice job rendering color in a vivid but accurate way. Compare these to the shots done with the same camera on expired Tri-X. Leave a comment if you have an opinion about which are better. Lake Morena Oak

Lake Morena Ruins

Thursday, July 24, 2014

Pacific Southwest Railway Museum

A couple of weekends ago, my family packed up for an outing. We live in San Diego which is pretty hot in the summer, but with two boys in school, we don't have a lot of options for getting out of town. The youngest wanted to go 'camping', but here in So. Cal. the camp sites have to be reserved and they get filled up about 6 months in advance. So there we were without a reservation, wondering where we could go. So with a little searching, we found a small lake down near the border and out east about an hour away. It was going to be hot there too, but at least we could get away from work and 'routine'. One of the up-sides of this location was that it was near Campo, CA and in Campo is the Pacific Southwest Railway Museum. I figured that there would be ample photo opportunities there, so I brought my large format (4x5) Speed Graphic and 6 sheets of Kodak CSG x-ray film. Taking only a limited number of sheets forces me to slow down and consider my shots more carefully. So here are the three best shots from that day.


I have to say that I was pleasantly surprised at the museum. I am not an 'old train guy'. I am an 'old camera guy', but the two are oddly akin. They are machines of a bygone era that hold a fascination for those who still use them. They are more mechanical than electronic, with gears and springs and levers doing the precision work of taking photos or moving people and cargo. The Pacific Southwest Railway is definitely worth a visit. The 12 mile train ride through the rugged California back country is wonderful for all ages. The display house has some great engines and restored cars that you can get right into and feel like you have stepped back in time.

I hope you take a trip down to Campo and see the Pacific Southwest Railway Museum. It is worth the drive and if you bring along your camera, you will be rewarded with lots of great photos.

Monday, July 21, 2014

Pushing Through XV - The Final Entry

I have really enjoyed putting this series together. Looking for examples when I was out walking around my suburban environment turned out to be easy. Finding somewhat unique examples at a time of day that rendered them aesthetically pleasing was a bit more of a challenge. I always had in mind the photo I wanted to end the series with and so when I saw it while hiking around Lake Morena, I took a couple of shots with my '39 Voigtländer Bessa on some expired Tri-X I had loaded. It was mid-day, so the light is less than desirable, but I took the photos anyway and now I think it is time to bring this to an end and move on to another photo project. I hope you have enjoyed the series and look forward to any comments you would care to contribute.

Saturday, July 19, 2014

Pushing Through XIV

This entry into the series is a little different. The theme of these photos is nature "pushing through" the obstacles set up by mankind. However in this case I found nature pushing through its own obstacle. We recently took a long weekend holiday out to the east of San Diego near Campo, CA at a place called Lake Morena. It is an old reservoir intended to store water for the city of San Diego. It was also a fishing lake that was stocked with various types of fish for sportsmen to catch. Recently, the decision was made to drain teh water down to other storage reservoirs closer to the city. This left Lake Morena at just 4% of it capacity. Really it is now a very small body of water and from our camp site, we could not see the lake, but we had a nice view of a meadow where the lake used to be. Right between our cabin and the meadow was a very big, very old California Live Oak. That is not very interesting, but what was interesting was that it was growing out of a crack in a huge outcrop of solid granite.

I can imagine a bird or squirrel dropping an acorn there in a small crack and maybe there were a few wet winters and mild summers that allowed the little sprout to get some roots down. Over the decades this tree has grown and actually pushed against the sides of the crack to expand it, sending roots deeper and growing bigger. Today it is truly beautiful and its branches spread out over the granite making a nice cool spot for animals and people to escape the summer heat.

This tree won't live forever, but it will live for a few hundred years, after which there will be a bright spot over a roomy crack in a big granite boulder... a perfect place to put an acorn for safe keeping.

Sunday, July 6, 2014

PhotoShop Cyanotype Negative Postcard

I thought I would just do a quick tutorial for those who may not be super familiar with PhotoShop. The project is intentionally simple and intended for those just starting out with the tool. Since what I am doing is so simple, the steps will be very similar in GIMP if that is what you are using. The tools I am using are common to both applications.

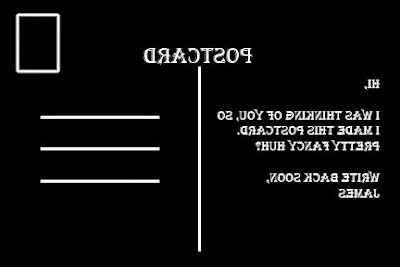
First, create a new file of the size you want your postcard to be. I chose 4x6 and filled the background with white. We are going to invert the colors later, so if you would rather work on a black background, that will save you a step at the end. I made my project 8 bit grey-scale since I am making the 'back' of the postcard (the part with the address and stuff). So now we have a white "card" to start working with. Now before you ask "Why don't you just do a google image search and use someone else's image?", I will say that a) this is fun and b) I'm guaranteed not to infringe anyone's copyright.

Next, let's make a new layer and draw some lines and boxes. In the layers dialog or in the layers menu, create a new layer and name it "Lines". In PS, you do this by right-clicking the layer and going to the 'Layer Properties' item. Select the title box and type in the name you want. Now to start drawing. Select the Pencil tool and set the size to 3px. If you don't have the rulers showing, you should turn them on by looking in the 'View --> Rulers' menu. In PS press Ctrl-0 (in GIMP Ctrl-Shift-J) so that your image will fill the workspace. I am going to start with a vertical line that separates the left "message" side from the right "address" side. I don't want to go from edge to edge, so I start 1" from the top edge and 3" from either side. Click once to make a dot there. Now move your mouse down to a quarter inch above the lower edge and still at the 3" mark horizontally. Hold down the shift key and click once again. You should now have a nice straight line. If your line is slanted, erase it and try again.

Next, let's make some lines to write your address on. Again with the pencil tool and watching the rulers I made my first dot at the 3 5/8" mark horizontally and the 1 3/4" mark vertically. The next dot (shift - click) was in the same place vertically and at the 5 3/8" mark horizontally. Great I have the first of three address lines. Now getting two more of these to be exactly the same is not too hard, but is is so much easier just to copy the one I have and paste it twice. Then I can use the move tool (four arrows pointing at NSEW directions) to position them. So use the rectangular marquee tool to draw a box around the horizontal line you just drew. Then Ctrl-C. Then Ctrl-V. It may paste it directly on top of the existing line, so just grab it with the move tool and drag it down to where you want it. I positioned mine 1/2" apart.

Great, now we need a place to put the stamp. This is sort of frivolous since it will probably be covered by the stamp itself, but we're here, right? Might as well do a good job. Choose the rectangle marquee tool again and draw a... uhhh rectangle in the upper right corner about the size of a postage stamp. Precision is not important here. This is just decorative. Box drawn? Good. Now select the 'Select --> Modify --> Border' menu and in the dialog box choose 2px for the width. Now you should have two concentric boxes selected. Click on the Bucket Fill tool and click in the little space between the boxes. That should give you a nice rectangle to put your stamp on. Just a couple more steps and we'll be done.

Now we are going to put some text on the postcard. One piece will be the word "Postcard", just so people aren't confused about what kind of mail they are getting from you. ;) Choose the text tool which usually looks like a capital 'T'. and draw a big box across the top of your card above the vertical line. Don't worry too much about the position as we are going to reposition it once we get the word typed. It might take a few tries to get the size right, but just keep trying. Fonts are very personal and so I will leave that choice up to you. I like a 'classic' look, so I use Algerian around 24pt. Then I use the move tool to grab the word and position it above the vertical line. If you choose, you can put some text in the left message section or leave it blank for hand-writing a note.

Finally, I am going to use this for contact printing cyanotypes. Obviously, you could just print this onto a sturdy card stock, print a photo or draw something on the other side and that would be awesome too. But I need a negative, so first I go to the 'Image --> Image Rotation --> Flip Canvas Horizontal' menu and flip everything backwards. This is because I am printing this face-down, so it will be right on the final print. Next I create an adjustment layer and choose 'Invert' so that I now have white lines and words on a black background. GIMP doesn't have adjustment layers, so you have to just go to the Color menu and choose Invert.

That's it! You now have a postcard back ready for your art on the other side. Like I said, this was pretty simple and you could probably get by with almost any simple drawing tool. Heck, you could probably do it in Word or Excel or PowerPoint for that matter. I personally think the drawing programs like PS and GIMP bring a lot to the table to make things easier and they are very much worth the time to learn. I hope this was useful and that you can take this simple tutorial and use it to create something wonderful!

Friday, July 4, 2014

Pushing Through XIII

Here is another in my series where I am capturing plants that are defying man's attempts to control them. You can see the rest of the series HERE.

This shot was taken in the waning light of late twilight. You can see the sodium lamps in the distance. The sky looks brighter than it was because I made a 5sec exposure on Portra 160 film. It was even too dark to get the focus right. You can see that it is about a foot or so in front of the particular bushy plant that I was 'aiming' at. This plant is growing up between the ties of an abandoned railroad track. The trees overhead are dropping debris on the rails as well. If this keeps up for another 10 or 20 years, the tracks will be lost to the mini urban jungle that is growing up around them.

Sunday, June 29, 2014

Fresh or expired?

I use lots of different films. Mostly because I am cheap and will take just about anything I find at a bargain. So my photography doesn't really have a consistent "look". That bothers me sometimes and then not at other times. Today it isn't bothering me. I just got done scanning four rolls of film and so I am a little excited about what I got. Scanning film is on one hand really tedious, but on the other hand it's like being a kid again on Christmas morning. The first time I see the negatives in inverted color, I get that sort of 'awe' feeling inside. It is surprise and delight and relief all in one.

I had 3 rolls of 35mm film and one of 120. The 35mm was all Kodak Ektachrome Slide Duplicating Film that had expired back in 1981. The 120 was fresh Kodak Portra 160. I had developed them all in Unicolor C-41 chemistry which is 'right' for the Portra, but 'cross' for the Ektachrome. Read more of my Adventures in Cross Processing here. So why am I making yet another post about this technique with the same old film?? Well the point here is to compare fresh negative film with expired slide film using photos of the same subject(s). This isn't strictly scientific since the photos weren't taken at the same time of day or under any other strictly controlled conditions. If you want that level of technical correctness, you will have to look elsewhere. I do science for a living, so I'm in this for the fun of it. But it is worth a look just to compare.

First the photos on the fresh Portra 160. I used my Yashica Mat 124G to take these. This poor camera is barely clinging to life, but still takes pretty good photos.


Nice, huh? The colors are natural, the grain is quite fine. I could easily blow these up to 24x24 inches and hang them on my wall if I chose to. In short, it is everything we have come to expect from this exceptional film emulsion.

Next, the photos from my Chinon CP-5. This was the first time I had used this camera, and I am pretty pleased with the quality of the glass and the exposures all seem correct.


This film creates a (to my eye) VERY different look. The colors are shifted (even when 'corrected' by the scanner) and saturated a little bit. The grain is noticeable, but not obtrusive. I think it lends a bit of a painterly or 'pictorialist' quality to the photos. It is short of the 'hipster/lomography' look that I think has been a bit over-done (just my opinion).

The bottom line is that I like both sets of photos, but I slightly favor the Ektachrome. It's very subjective and my opinion is likely to flip flop over time. Whichever you like better, I hope you enjoy them and have fun shooting some expired slide film on your own sometime.