Monday, December 11, 2017

Film Hack - Fuji Eterna

I like shooting movie film. It is cheap and plentiful and with my new DIY ECN2 chems, it is super cheap to develop at home with accurate color. The one and only down-side is the remjet. For the uninitiated, remjet is a powder-coat on the back of movie film that serves as the anti-halation layer as well as an anti-static agent for films that travel at high speed through a movie camera. There are numerous approaches to dealing with remjet, but they do not include just sending the film off to your usual color lab. The remjet comes off in their machines and tends to get redeposited on your (and everyone else's film). That makes them unhappy with you and you will be invited to never send them any film again. So I choose to develop color films of all sorts at home, but I still need to deal with the remjet for the same reason. I don't want it coming off in my developer, bleach or fixer and then getting redeposited into the emulsion of future films. So I use a sodium bicarbonate (baking soda) solution (about a tablespoon per liter) as my first pre-soak (about 2-3 minutes). Then I shake it like crazy... I mean really shake it like you are trying to prank your little brother with a can of root beer. Shake it for a solid minute, then pour it out. It should look grey. Then rinse and pour until the rinse water is clear. Now the remjet is gone and you can continue with your regularly scheduled development process. That's it! Well, not quite. If that was it, then this post would be done, but it isn't. Keep reading.

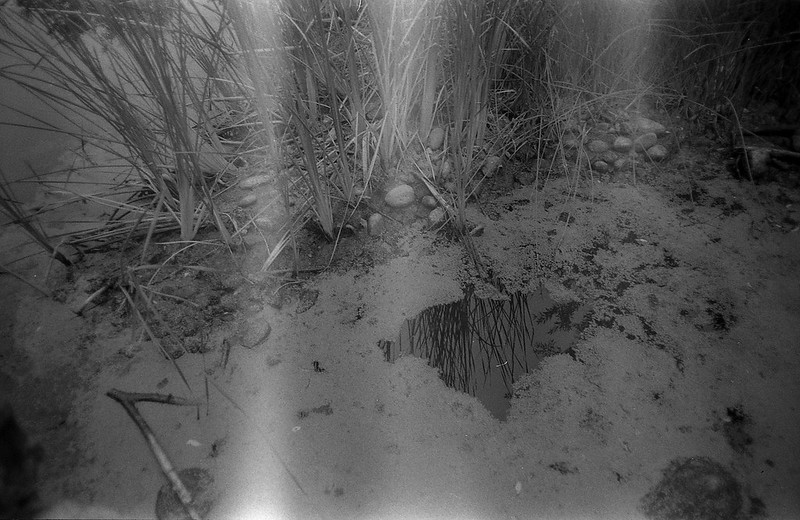
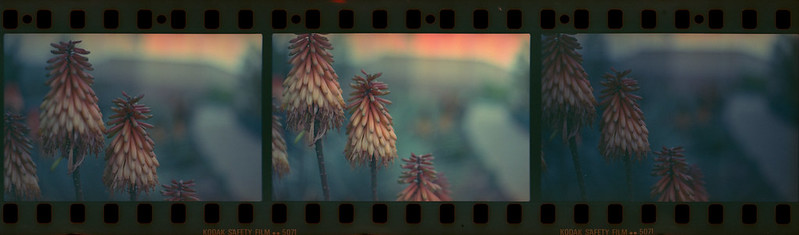
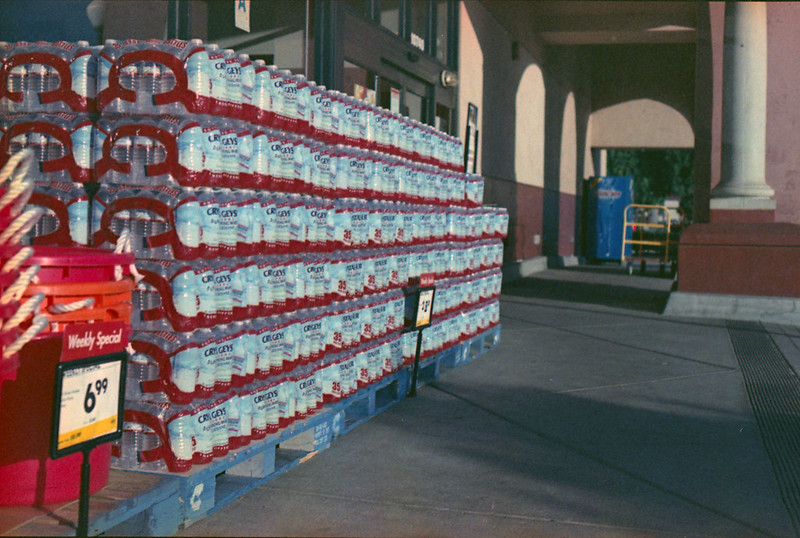
Often, the soak-shake-rinse process is imperfect. That means that there are places on the film where the remjet doesn't come off. So at the end I will take the film off of the developing reel and gently, oh so gently, rub the back of the film with my thumb under warm running tap water. Even then, there are places I miss, but I can't tell where they are until the film has been hung, dried and scanned. Then I see something like this.

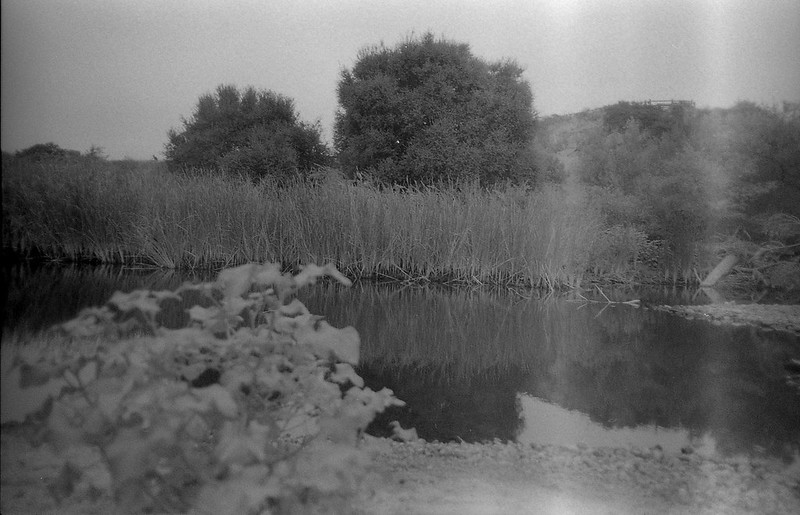
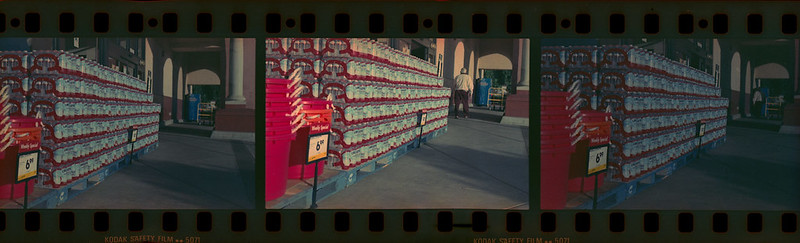
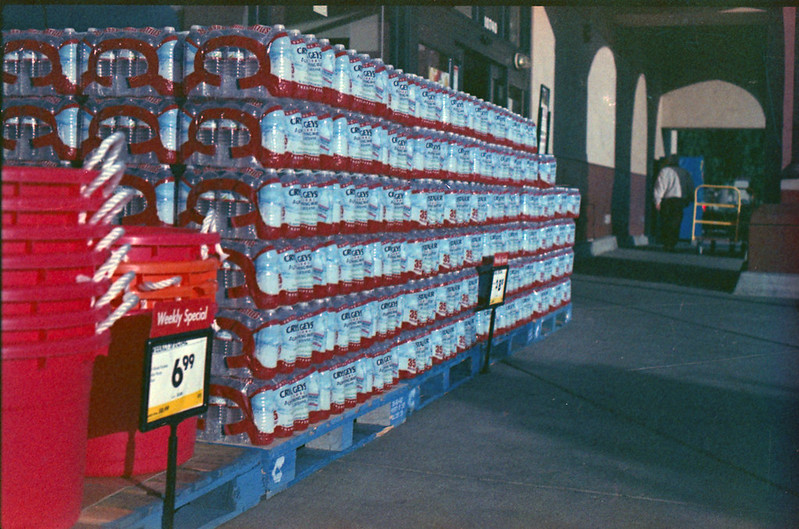
GAAAH! What a mess! Now what? One alternative is to make another bath of bicarb and try some more gentle rubbing to see if I can get it cleaned up. But that is an iterative process that could take a loooooong time, and I am impatient. I honestly can't remember how I discovered the second (and much better) alternative. I must have been desperate, or maybe it was an accident. Here it is, the secret to quickly and easily (and completely) removing bits of remjet from your film. Hand sanitizer. That's right. Get a couple of those little cloths that you clean your glasses with. Lay the film emulsion-side down on one. Then get a little dab of the sanitizer on your finger and gently rub it on the back of your negative. Don't rub so long that it evaporates, just long enough to dissolve the remjet. Then use the other cloth to wipe it off. This is what I get after that process. Note: I did not correct, adjust or clean either of these scans. They are "straight outta scanner".

"But James", you ask, what happens if I get the hand sanitizer on the emulsion side by accident?" I honestly don't know. My intuition says that in all the times I have done this, I must have at some point gotten sanitizer on the emulsion, but I have never noticed any smudging, smearing or any other artifact that made me think I had. So the usual disclaimers apply. This is the internet. I am not a professional (or even trained) film cleaning expert. I claim no responsibility for the destruction of every frame you shot at your cousin's wedding if you try this procedure. Try it first on a crappy shot of a Christmas concert! Happy shooting!!

Saturday, October 14, 2017

DIY Color Dev Comparison

If you have by chance read any of the other posts on this blog, you might have gotten the impression that I am into do-it-yourself (DIY) film developing and historic (aka 'alt') processes printing. That is really only half true. The other half of this blog is that I'm really cheap and am always looking for ways to economize with my photography hobby. The third half is that I just like taking pictures on film rather than with digital devices. So having said that, this post is about my first foray into making my own color developers. I started down this path when I somehow cross-contaminated my Unicolor developer with the blix, thereby killing all activity and pulling 3 completely clear rolls of film out of my developing tank. That sucked and it was completely my own fault for not doing a test strip. Always do a test strip in the developer! Anyway, I was faced with the choice of buying another kit (not a bad or really expensive option) or figuring out how to make my own (attractive to the chemist in me and probably cheaper). I googled up this post over on Flickr and it seemed like a reasonable place to start. I had most of the chemicals, so I just needed to get the developers for C-41 and ECN2. ECN2 is the process used for 35mm movie film (like Cinestill). Most people just cross process it in C-41 and it looks fine, but I thought there was enough overlap in the chemistry that I could just get the developer and give it a try.

I bought the developers from Artcraft and the other components either from Amazon or eBay. I did the calculations for both developers and bleaches and they came out pretty close. For a liter each of C41 developer and bleach it cost $5.47 and for a liter each of ECN2 developer and bleach it cost $4.57. I used my regular Ilford Rapid Fix diluted 1:4 and didn't include that in the cost, but it's cheap too. I know that (if I'm careful) I can get 25+ rolls through a Unicolor kit. So if I only get 5 through this DIY mix, that effects the price per roll. That will take longer to determine, so stay tuned.

These are the recipes I used for each developer and bleach:

C-41 DeveloperECN2 Developer
Sodium Carbonate - 24gSodium Sulfite - 2g
Sodium Sulfite - 3.6gPotassium Bromide - 1.4g
Potassium Bromide - 1.6gSodium Carbonate - 25.6g
Hydroxylamine Sulfate - 2gSodium Bicarbonate - 2.8g
CD4 - 5gCD3 - 4g
Distilled water to make 1LDistilled water to make 1L

C-41 BleachECN2 Bleach
Potassium Ferricyanide - 80gPotassium Ferricyanide - 40g
Potassium Bromide - 20gPotassium Bromide - 29g
Distilled water to make 1LDistilled water to make 1L

C-41 Times all 100FECN2 Times
Developer - 3:15Developer - 3:00 @ 106F
Stop - 00:45Stop - 1:00 @ 100F
Rinse - 00:30Rinse - 1:00 @ 100F
Bleach - 3:30Bleach - 6:00 @ 106F
Wash - 1:00Wash - 1:00 @ 100F
Fix - 5:00Fix - 5:00 @ 100F
Wash & fotoflow - 5:00Wash & fotoflow - 5:00 @ 100F

Here's what I did to test out the developers. I loaded up a roll of expired Eterna 500T into each of two comparable cameras (Pentax K1000 and Chinon CP5)with comparable lenses (50mm f/1.8-ish). I used the Chinon to meter at iso 250 (1 stop over exposed per decade past expiry) and then set the K1000 to the same exposure and took the same shot. I put both rolls into a dev tank and soaked them in remjet remover then shook and rinsed in tap water until it ran clear. Then I put one roll into a different developing tank. I repeated the shooting process with two rolls of regular C-41 film (Fujicolor 100 - expired, shot at iso 50). Each of those rolls went in with one of the Eterna rolls and I developed one tank with my DIY C-41 developer and one tank with my DIY ECN2 developer. So what I have now is two rolls with identical shots, one developed in 'native' chemistry and one cross-processed. I scanned each roll with color correction turned off, then I scanned it again with color correction turned on. I am using my Epson Perfection V600 flatbed scanner with the bundled EpsonScan software. So enough talk, let's see some pictures!

First up we have the Eterna.

Images on the left are developed in native ECN2 chemistry and images on the right are x-pro'd in C-41. First I did a straight scan with no color correction. These are obviously different. The C41 developer made denser negatives. They weren't so dense that the scanner had any trouble with them, but just good to know in case you are intentionally over-exposing, which is a common practice with color negative film. The color difference on the raw scan is not really reflective of any real difference in the color of the negatives as I look at them. Just the density seems to be different. Now let's see what the scanner does with color correction.

Now we're getting something interesting. Never mind the low contrast on the lower left shot, that's probably an issue with the scanner on that frame. I could have corrected it, but I really wanted to compare the color hue between the two processes. What I see is that the native process is reproducing a more 'true' color. That shouldn't surprise me, but I never really thought that C41 x-pro of cine film gave much of an "x-pro" look. I always thought it was just the tungsten balance cooling everything down. But now I can clearly see that the colors are shifted, and significantly.

Next let's look at the Fujicolor 100 film, designed for the C-41 process. For consistency, I will keep the ECN2 negatives on the left and the C-41 on the right. First the raw scans.

Pretty much the same story here. Not much to say, but the ECN2 negs are denser. But look at the color corrected scans.

The Fujicolor C-41 film is actually showing more dynamic range in the ECN2 developer. Now that's interesting. There is some color shifting going on as the orange umbrella on the right is the 'truer' color, but given this 'out of the box' corrected scan, I think I like the ECN2 developer results better!

So what did I learn with this little experiment? I think either film works adequately in either one of these DIY developers. Now it comes down to personal preference. Do I like the x-pros or the natives? I think I like the x-pros better in both cases. The C-41 developer gives the Eterna a bit more of that "cinematic" look that I want when I shoot that film. The ECN2 developer certainly provides a saturation and dynamic range bump to the C-41 film thought the blue-shift might need a little work in post. I am excited to try these developers on different color films in the future. Since they are so cheap to make, I suspect that they will become my regular CN developers going forward.

Please leave a comment if you have any further information, or experience with these homemade developers. I'd love to hear from you. Also, check out my Flickr album to see more photos from these rolls.

Wednesday, September 13, 2017

An Unexpected Leak

That's like a chapter title from a bad spy novel (or maybe a bad plumber's manual). Anyway, I just thought I would make a brief post to show the dangers of using thin base films. Generally we think of film as just emulsion layered onto a sheet of flexible thin plastic that is then cut, perforated (optionally) and rolled. I realized when I started developing my own film that the 'base' support is quite different for different films. Certainly color films are different than black and white. The support material on most color films is some shade of orange, while on black and white films it is either clear or a neutral grey. But what I hadn't really thought about was that the support material is different thickness depending on the film and it's intended purpose. Movie film needs to be thick and strong enough to stand up to the forces that are pulling it through a movie camera. Still camera film can be thinner so that more exposures can fit into a standard roll. Then you have specialty films like Kodak Plus-X Aerecon II. I have written about this film before, but I don't think I have mentioned much about the consequences of rolling it into standard 35mm cartridges. Standard cartridges have a little fuzzy piece of fabric around the inside of the opening where the film leader comes out. That serves dual purposes. First, it keeps the metal edges of the canister from scratching the film. Second, it acts as a light seal so that light does not enter the canister through the slit and fog the film. Well that's all fine if your film has a thick base support layer and it takes up all of the space between the two light seals on either side of the slit. However, Aerecon II was intended for aerial reconnaissance photography. When flying long distances, it is important to economize on weight so that your fuel will last for the entire mission. So the film was made with a very thin base so that a big roll of a few hundred or a thousand feet would weigh significantly less than it's consumer counterparts. This means that the film does not fill up the space between the light seals in a standard 35mm cartridge and if you are not careful, the light will come in and make nice stripes on your beautiful pictures. So let this be a warning to all of you shooting thin base films. Load and unload in the DARK! Not the shade, and not 'subdued light'... the DARK. Cautionary photos to follow.


K1000-AereconII-001
K1000-AereconII-002
K1000-AereconII-003

Sunday, July 23, 2017

Moving Forward in Reverse

If you read my article on lumen printing, this is sort of an addendum or appendix or epilogue or sequel. I had the paper cut, but for the lumen prints, I had cut it in sort of dim diffuse room light, so those pieces are really only good for lumen printing since they are a bit exposed already. So I went and cut some more 8x10 Agfa Multicontrast paper under my red led headlamp (hung about 30" above the work surface). Those pieces went directly into film holders. I had read about reversal processing film a while back (reversal processing is how slides or transparencies are made) and was sort of interested, but the bleach put me off. Most reversal process bleach is made with dichromate or permanganate compounds which are pretty toxic and best avoided if possible. So I shelved the idea of diy reversal. Then I read an interesting article about a fellow who made a working reversal bleach with just household hydrogen peroxide and lemon juice (the active ingredient there being citric acid). WHAT!? This I've got to try. I didn't have any film ready to develop, so why not try with the papers? It's more or less the same emulsion, just with a different base and in the case of RC paper like mine, a different top coat. What the heck, let's just experiment!. The article called for caffenol for the development steps, but I didn't have any of that ready to go. I did have some homemade my-tol(X-Tol knock-off), so I figured I'd just use that at stock concentration and see what happens. I read on APUG that you can develop paper with X-Tol stock for about 5 minutes, so that's where I started. Here is an overview of the process I used (note, I used 9g/L dry citric acid in place of lemon juice):

>
STEPTIME
1st developer (my-tol)5 min
Wash5 min
Bleach (cit. acid-hydrogen)11:30 min
Wash5 min
Re-exposure 300W at 1 meter2:30 min
2nd developer (my-tol)5 min
Wash5 min
Fixer5 min
Final Wash5 min
Wetting agent2

The first sheet I did with straight stock my-tol for 5 min in both development steps. Here it is. This is a straight color scan without any added colors, curves or contrast.

A couple of notes worth making here... I was tray developing under red light so I could see what was going on. After a couple of minutes in the first developer, the paper looked completely black. I couldn't see any image at all. I was a little worried, but I kept going because I knew that this was not necessarily an indication of failure yet. The bleach brought out a little bit of an image. I could just make out some light areas. Once I turned on the room lights for the re-exposure step, I could tell that the image was there still. It looked bad and was very low contrast. I thought, "well I guess I'll have to correct it in post." That's not what I was hoping for with this process, but sometimes that's all you get. But then I poured in the 2nd developer (same developer as I used in the first developer step) and there was the image, nice and crisp and contrasty in tan and deep black. That is when I got excited. The fixer didn't change the image since there really isn't any undeveloped silver left at this point.

The next set of exposures I did with 1:1 my-tol, thinking that I might lower the contrast a bit. Unfortunately, I was tray developing these together in an under-sized tray and so there are artifacts where the sheets contacted each other. But these are experiments, not art. What I was trying to see was whether the dilute developer would lower contrast. I don't think it did. Maybe more dilution or a different type of developer (vit. C based like caffenol or parodinal) would work. Maybe something as simple as preflashing the paper would work. These are all variables that can be explored.

So there you go. I think I really like this process. If anyone else has experience and wants to share some tips, please do!

Wednesday, July 19, 2017

Lumen-osity

I have not been a fan of the lumen print. Let's just get that out there. If you are, then keep reading (spoiler alert: I am now). Recently, over on Filmwasters, there was a discussion of the 'Lumenbox' which is a box camera designed with lumen printing in mind. But I'm getting ahead of myself. What is a lumen print? For that matter what is a lumen??

lu•men


/'lōōmən/
noun physics
the SI unit of luminous flux, equal to the amount of light emitted per second in a unit solid angle of one steradian from a uniform source of one candela.

I'll wait while you go look up "steradian"... Now that that's out of the way, lumen printing is simply the process of using regular black and white photo printing paper as a print out paper (POP) medium. That means you get a negative without using any chemical developer. Now in this case that may not be strictly true, but we'll get to that in a minute. So why the turn around on lumen prints James?? Well, I have really only ever seen contact prints of leaves and flowers done as lumen prints. I have nothing against leaves and flowers, but the lumen contact prints just didn't appeal to me. I don't have a good reason, it's just "because". Back to the Lumenbox camera. This guy put a simple meniscus (single element) lens on the front of a box and put a piece of photo paper in the back. He did this all in daylight, knowing that the paper, without being developed, is not very light-sensitive. He pointed his camera at something stationary for 15 minutes and pulled out a photo! Now I was a little intrigued, but not enough to buy one of his cameras... just interested. Then on Filmwasters, the people were discussing the camera and lumen printing in general and who else but Joe Van Cleave posted a couple of videos (vid 1 and vid 2) about some experiments he did with this method and his own little box camera. That really piqued my interest, especially the idea of integral developer (developer embedded in the emulsion of the paper). He and the Lumenbox guy both took the image using wet paper. The idea there was to wet the paper first and then expose it and the water will allow the integral developer do its thing while the exposure is taking place. To me that seemed overly complicated and potentially messy, especially as in vid 2, Joe puts a wetted paper into his Speed Graphic. That's a risk I'm not willing to take. So I thought if the developer is there, then there's no real reason it has to be 'activated' during the exposure. The light is doing its thing to the silver halides and the developer can wait, just like with any expose/develop process. The integral developer is intended to speed up processing, not raise the effective ISO. So it shouldn't matter when you wet the paper and activate the developer. So my thought was to expose the paper dry, then dunk it in some water to let the developer do its thing. So that's what I did. I cut a piece of paper down to 4x5 and put it in a film holder and put that in my Speed Graphic. Then I set the aperture wide open to f/4.7 and put the shutter on 'T'. Then I pointed it at a ponytail palm on my patio that sits against a white wall and left it there for 20 minutes.

I scanned and inverted the dry paper right out of the camera and got this:

That's not bad! It's a little blue, but if you don't like that it could be desaturated:

So then I thought I would try some alkaline water to really get that developer kicked in the acid! I put a pinch of washing soda (pH 11!) in some water and dunked the paper. I could immediately see things starting to happen... Bad things!! There were blobs and streaks and uneven shading and, well you get the point. The integral developer had either already reacted with something else, or was breaking down in some unpredictable way. But this was the result.

At this point the negative is destroyed, but I figured it was worth one more experiment, so I put it into some paper strength fixer (Ilford Rapid Fix 1:9). I will save myself the time of uploading it and just say it didn't help. It might have lowered the contrast a bit, but the blobs and streaks were still there.

So there you go. Lumen printing in a large format camera. I suppose you could try doing optical prints from the negative produced, but it probably wouldn't work. The negative isn't dense enough to really block any light and the light of an enlarger would probably fog the negative during the process. But don't let me discourage you if you are an experimenter. My idea here was to expose dry and then get it wet to 'develop', but what I learned was that there really isn't any need to have any aqueous involvement at all. The dry lumen print stands on its own. I hope this is informative for someone. If you see some glaring error in my logic or process, please leave a comment and we can all learn together.

Friday, June 30, 2017

Robot Camera - Kodak 35RF

I like "robot cameras". By that I mean cameras that have exposed machinery like gears and levers. There is something to be said for the sleek, plastic-shrouded black boxes like the Contax T2 or the Konica Hexar with their clean lines and mysterious lack of 'machinery'. They take fine photos to be sure, but (for me) they don't hit my "that's so cool!" button. That button is actuated by dials and levers that make ratcheting noises and knurled knobs and gears. So when a friend over on Filmwasters said he had a spare Kodak 35RF that he would trade, I jumped.

Kodak35RF

Where to even start? Well, maybe a brief description... The Kodak 35RF is a 35mm camera with a coupled range finder. It was made from 1940 to 1948. My example rolled off the assembly line in 1946 as indicated by the CAMEROSITY code of 'EO' on the lens. So what's so cool about this camera? I guess the first thing that catches my eye is that gear to the left of the lens. That's for focusing. You turn the little gear with your index finger and the magic happens inside the lens. This is done while looking into the tiny range finder window. That brings me to the next cool feature. There are three freakin' windows on the front of this thing. Each one is a different shape and size which gives it a touch of art deco or maybe cubism. Then there is "the shield". The shield is a piece of metal that covers what I imagine is the mechanism that couples the lens focusing ring to the viewfinder. The shield also extends over the top of the lens and provides a protective er... shield for the shutter release, so you don't accidentally hit it and get a picture of your shoe or the butt of the person walking in front of you. Speaking of the shutter release, it's out on the lens barrel, not on top of the camera like you would expect. There is a button right there on the top right side. It looks like a shutter release, but don't be fooled. It's not. Push it as many times as it takes to convince yourself that the shutter isn't responding to your command (it took me three slow presses and then about five 'spam clicks'). That button releases the film winding knob, so stop pressing it. You need to hold it down and start winding the knob clockwise. The winding process, besides taking a little coordination, takes a little hand strength as well. It is a firm quarter turn with a satisfying "CLACK!" at the end. If you are thinking of loading this up with a thin-base film like Plus-X Aerecon II, think again. The film sprocket holes engage a very tight sprocket and they will tear. In fact my first roll through (Fujicolor Super HR) tore some sprocket holes and that caused the frame counter (next to the winding knob) to do wacky things. My second roll (Ilford FP4 plus) worked just fine. The back comes off to load/unload the film just like most 35mm cameras of this era. The take-up spool is fixed and the slot that accepts the film is quite thin and a bit fiddly to get the film leader into. The rangefinder window, as I said, is very small but the split-screen rangefinder is pretty easy to use. The top and bottom images are both bright and well magnified. The viewfinder window is also bright and easy to use even for me with my required glasses. There are no framing lines or parallax correction that I could tell, but the minimum focusing distance of around 3.5 ft doesn't really require much correction and I didn't notice any badly framed shots. That's about all I have to say about the operation of the camera.

The results I got with this camera were pretty good. It's not in the upper echelons of cameraness like an M3 with a Summicron stuck to it, but for a cool looking robot camera, it takes good pictures. Let's look at a few shots. The first roll lie I said was Fujicolor Super HR. I shot this at iso 200, so here in sunny San Diego, that means the lens aperture was pretty much pegged at f/16 for the whole roll. That gave me a good idea of the sharpness and contrast it was capable of.

Barber Pole
Rigging
Pencils

The next roll was some expired rebranded FP4 Plus that I shot at iso 50. I have shot this film at that iso before and it came out just fine, but this time the negs were very dark and hard to scan. My poor V600 could barely push enough light through some of them to get anything at all. So these look grainy, but that's really noise because the scanner had to crank the voltage on its sensor up to 11! This was a result of me switching developers and not really experimenting enough to get good results. I think the shutter speeds are all pretty accurate (enough for me anyway) and given a better film/dev/time combination, it will do just fine with slower films. The lens also performed adequately corner to corner with maybe a tiny bit of softness at wider apertures, which I also don't mind.

Raised Bed Veggies
Vendetta
Sycamore

Over all, I think this is a keeper and I might get some other robot cameras (e.g. Kinaflex) to keep it company.

Sunday, June 11, 2017

70 + 35

I finished off two rolls of color film. Nothing exciting there. One of them was 35mm. Still nothing. The other was 70mm (616 format). That's a little more interesting, since I don't have a developing tank with a spool that holds 70mm film. Standard Patterson spools will take 35mm, 127 (46mm) and 120 (60mm). So I improvise... I take apart a standard spool.

The bottom half is the 'outer' piece that has a bigger hole through the middle. That slides on the center post.

The upper part slips down on top and I use a rubber band around the column as a 'stop' that holds it at the right place for 70mm. Loading the film is a little fiddly to get started. Doing a good job estimating the height is important. It will be about a millimeter shorter than the backing paper, so use that as a guide. If you have to adjust it in the dark, it's not that hard. This has to be done with the two halves on the center post, of course.

Then I slide the 35mm spool on top of that (after loading the film). One liter of chemistry will cover these two films in this configuration. I didn't check that before I started, but noticed when doing the stabilizer step that they were covered (whew!)

The camera I used for the 616 film was an old Agfa PD16 Clipper. I love the simplicity of this point and shoot viewfinder. Fixed focus, fixed aperture, fixed shutter speed. Literally, point and shoot. The film is Vericolor III (expired 1989). In good sunny conditions, this pair works pretty well together.

Reflected

The camera I used for the 35mm roll was a Kodak 35RF I got in a trade.

Pencils

Sunday, June 4, 2017

Gone Microfiche-ing

Using expired film can be a bit of a challenge. There is usually some loss in speed, so the apparent iso (or the effective EI, if you like) is lower and it is up to you as the film adventurer to determine by how much. The rule of thumb says one stop for each decade past its expiration date. So assuming you know the expiration date and didn't just come across a random roll of film, you can use that as a starting point. Keep in mind though that 'fast' films (to me that means iso 100 and higher) will lose speed 'faster' than slow films. So if you have a roll of Ektar 25 that expired in 1997, that's 20 years (two stops lost), but since it was slow film to begin with, it probably didn't lose a full two stops. Maybe 1½ or 1 stop would be a better starting point. "So what's your point here Jimbo?", you may be asking. First, I don't really like "Jimbo", people called me "Jim" in college, but generally, it's just "James" and has been since Mr. Salyers' 4th grade class. Secondly, I'm getting there!

Periodically, I search for Kodak Dacomatic Recordak film to buy. I have some in the fridge and I really like it. So I just keep an eye out for a spool. I never find any. But then one day the search popped a result on the big auction site. It was "Recordak", but didn't say "Dacomatic". Additionally, it was 500 ft of 105 mm stock! Well, that seemed odd, so I did some more digging on the specific emulsion number (4462) and it turned out to be a completely different film (seems obvious now). This one was used for microfiche production. So it was copy film like the Dacomatic, but a different type. The price was right, so I went and bought it, hoping against hope that I could get pictures from it. It originally (expired 12/1979) was rated at iso 2.1! So, figuring that this stuff is really not very sensitive to light to begin with, I figured it probably hasn't lost that much speed even in almost 40 years, but I'll give it a stop anyway. That puts it right about iso 1. Okay, so I have an exposure starting point. How am I going to develop this stuff? It was designed with an automated proprietary development scheme in mind, so all I could find in the VERY sparse documentation was "Microfilm DEVELOPER and Replenisher". That's it. So I figured I would hit up the old stand by, Rodinal 1:100 and do a strip test to see if it would even change color. In fact it did! In about 15 seconds, it was fully developed!! So much for 60 minutes of stand development. Well, I cut a few sheets and took some of what I am certain were the best photos of my entire life and dunked them in what I had on hand, which was some homemade Parodinal 1:100 for 4 minutes. That is what I use for x-ray film and it works just fine. This microfilm however, was completely dark. Hmm... Maybe I over-exposed it? I tried again, taking more absolutely stunning photos at higher and higher speeds. Again, completely dark. So over-exposure was not the problem. It must be over-development. I cut the time in half. Still totally dark. I mean just a dark sheet of film... No image whatsoever. The strip test I did showed that the film cleared completely in the fixer, so it wasn't that the fixer was bad or the film was totally fogged.

I was just about to give up and call it a total loss, but I thought I would just try a different developer for grins. Rodinal variants have always developed anything I threw at them, including a roll of Ansco Plenachrome expired in 1949. But desperate times, you know. I had some X-tol powder laying about and that is a phenidone based developer, so I figured one last try. And this time, I would take a high contrast shot with lots of bright San Diego sky AND I would develop under red safelight by inspection. Did I mention that this film is orthochromatic? No? Well, now I have.

BAM!!!

Recordak-iso-1

I got an image! That was in X-tol 1:3 for 10 minutes. Now to see if I could get something with a few more grays in there. So I took a shot in the shade. I gave it a little more exposure because I had the bellows extended a bit, but I forgot about the reciprocity failure that was mentioned in the tech doc. The negative was very thin, but still there was a photo and it had much more scale to it. It is still quite fine grained and in 4x5 sheets that means some super fine detail can be had.

Retro Eveready Photo Cells

Now I've got about 490 feet left of this to see what I can do with this flavor of copy film. I'm looking forward to making some photos with this oddball microfilm.

Sunday, February 5, 2017

The Return of the Slide Dupe

Almost a year ago, I posted "The Last of the Dupe" as I shot, developed and scanned the last roll of my beloved Ektachrome Slide Duplicating Film. What is so lovable? I suppose it is really subjective, but I just like the way the grain and colors combine. Note: I always cross-process this film in Unicolor C-41 and scan. I do the normal things for scanning film like make sure my stupid scanner (Epson V600) isn't cutting off half of the histogram. But I don't do anything really in the "color correction" realm. So recently, I was looking around the interwebz for some more. I do this periodically, but not usually with any success. Either it is just a single roll, or it is so over-priced, I won't buy it, or both. So when I came across two 100' rolls of Ektachrome, I stopped for a closer look. The were unopened, expired in '80 and '81. One roll was regular Ektachrome 64D and the other was SLIDE DUPE!! I got very excited until I saw the price. $120 plus s/h put this expired film at ~$0.66/foot. That is about 3x what I usually set my limit at for expired film especially with no guarantee, returns, etc. So I put a watch on it to see if it would sell, just out of curiosity and I also wanted to keep track of it if it didn't sell. The film didn't sell and was subsequently relisted as an auction starting at $0.99. Now that's a starting point I can get on board with! I would usually wait until the end and try to snipe the auction, but I really didn't think this was going to stay reasonably priced. So I threw a bid on it for $30 ($0.15/foot). Who knows how, but I won the auction with a winning bid of $10.50! Including s/h the film came out to be $0.12/foot!! If the film was any good, I got a really great bargain. If the film was trashed, I was out $23, which I could live with.

So here are the results of the first few shots. Taken with my trusty Pentax K1000 equipped with the SMC 50/1.7 lens. I set the meter at iso 32 and then I took one shot on center, the next shot was one stop slower (iso 16) and the next shot was one stop faster (iso 64). The roll was developed at regular temps and times for Unicolor C-41.

K1000-SlideDupe-001
K1000-SlideDupe-002
K1000-SlideDupe-003

I did not adjust any levels or anything to make one shot look better than the others. I just set the histogram limits for black and white. At first glance, the iso 16 shots look best. But if you look at the last shot of the rose bud, you will see that the highlights blew. That is the only one taken in full sun, midday. So maybe 16 would be a good number if you are shooting this in diffuse or dim light (golden hour), but I think the iso 32 and 64 shots are more usable as far as the highlights and shadows go.

Here are the 32 and 64 shots from the middle set. I have adjusted these individually in order to compare on level ground.

K1000-SlideDupe-002-32
K1000-SlideDupe-002-64

It is easy to see that the shot at iso 64 has more grain and is a little cooler in tone. That is good to keep in mind in case that is a look I want. I might try another short roll like this and shoot at 64 and 125 and then push the development one stop. That might bring the warmth back to the colors and help with the grain a bit. If I decide to do that, I'll link it here. Until then I am just going to enjoy shooting my favorite film again.

Sunday, January 29, 2017

Russian Fog

I took a drive up to Oceanside, CA this morning. With me I had my Speed Graphic and my Isolette III. I haven't shot the Isolette in a while which is tragic because I really like the camera. However, I had loaded it with my least favorite film ever, Svema FN64. I shouldn't say that it is my least favorite film because there are films I have shot that gave no image whatsoever and those top the list for sure. Also, there are examples of FN64 that have produced perfectly acceptable results. I had bought a batch of 10 rolls on the auction site and for whatever reason, these rolls are fogged badly, in a weird way. I think I mostly wanted to just get it out of the freezer, but I feel bad about trashing film, even if it doesn't make images I like. Well, I guess I could sell it to the next unsuspecting bargain hunter, but I don't like foisting (that's right, I said "foisting") my problems on other people. So every once in a while I pull a roll out and shoot it, just in case something good might happen. I had shot that film before at iso 16 and there was one or two shots that were worth scanning and sharing, so I figured I'd try that same iso again. Once I get below 16, handheld gets harder to do and this was going to be my carry around camera for a week, so I didn't want to have to have a tripod everywhere. Maybe next time, I'll try 5 or 3.

Anyway, here are some results.

Isolette-FN64-010 Isolette-FN64-001

Note that you lose the last frame to the old tape. Seriously.

Isolette-FN64-003

The gear and film.

NikkormatFtN-AereconII-008