Showing posts with label reversal processing. Show all posts

Friday, April 6, 2018

Reversal - The Finale

Well, it took a while to get this all together and done, but I finally finished the project that I initially had in mind when I bought the Ansco 3A 122 'Postcard format' camera. I wanted to shoot paper in the camera and reversal process it to positive images and send them to friends as postcards. And that is what I did. I made 20 individual exposures on 20 pieces of Arista Grade 2 paper. I had to take the photo, then take the camera off of the tripod and put it in a film changing bag where I had an envelope for exposed sheets and one for unexposed sheets. Then I would remove the back of the camera and take the exposed paper out and put a fresh piece of unexposed paper in. Repeat x20. That took about 2 1/2 hours, just to take the pictures. Fortunately, I chose a beautiful location, the Old Point Loma Lighthouse, so spending time there was a delight. It was mid-January so it was pleasantly cool with a little breeze from the ocean and sunshine just barely filtered by some thin high clouds.

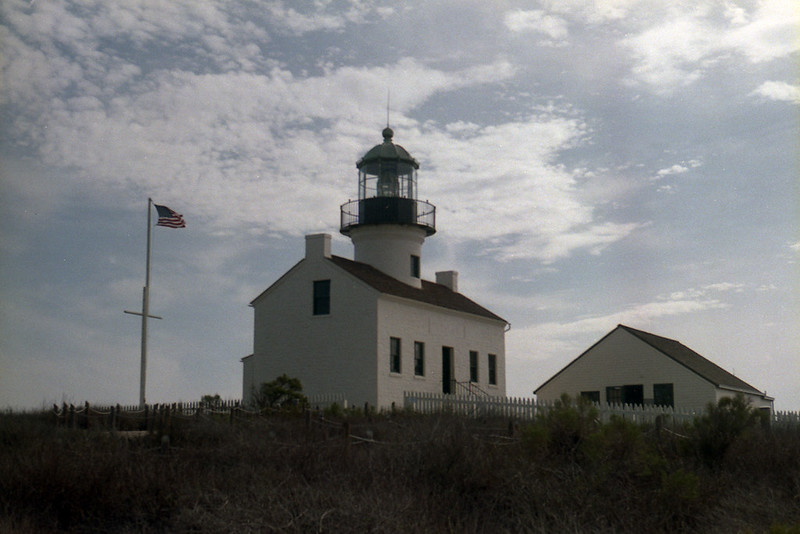
Here is a shot of it on expired Fujicolor, taken in my Vitomatic II, just for reference.Point Loma

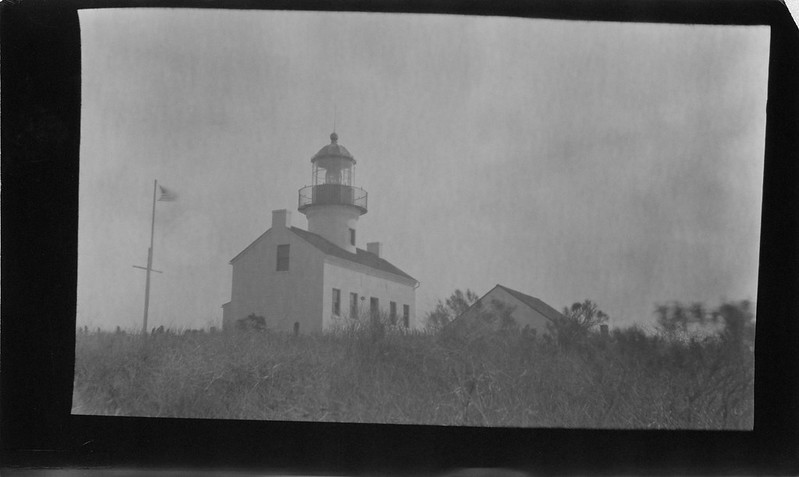
I have gone through the processing steps in previous posts and there is a long discussion over on Photrio about it, so I won't rehash it all here. I will just mention that the paper was graded at iso 2 which resulted in a 12 second exposure at f/64. So with no further ado, here is the result.

And here is a scan of the one of the postcards itself.

Old Point Loma Lighthouse

This was a super-fun project and I love sending these postcards off to friends and family. The Ansco 3A performed beautifully and was great fun to have out in the field. I highly recommend making postcards and sending them with hand-written notes to those you care about.

Monday, January 8, 2018

Reversal Revisited

If you remember this post about reversal processing images taken on photo paper (enlarging paper) in-camera, then this might be of some interest. I have done some more experimenting. At first, I made the terrible mistake of changing too many variables at once. I was trying different papers and rushing through the processing procedure and the results were all bad. In order to understand a process like this, you have to isolate a variable and just change that incrementally so that you can see what effect that variable has on the end product. So I decided to just use one paper (Arista Grade 2), one camera (Graflex Speed Graphic with the Graflex Optar 135mm lens), and one dev/reversal process (outlined in the aforementioned post). So I took 4 shots of a high-ish contrast subject. I only varied the exposure. I used iso ratings of 0.25, 0.5, 0.75 and 1.0. I know those seem like extremely low ratings, but it turns out they are in the right ballpark. I started here based on some vlogs by Joe Van Cleave as well as some initial Googling and experimentation. Anyway, I wanted to share my results, so here goes.

These are in order of low to high iso rating. The subject is a scooter and a padlock against a brown fence in direct sun. The exposures were all done at f/16 and the times were 4, 2, 1.5 and 1 second respectively.

I can tell very little difference between the last two, but they both look about right. They might tolerate a bit less exposure, but for a regular scene with more mid-tones, I think iso 1 will do nicely. So here's what I think I am learning about this process. Expose more than you think you should. Develop to completion on both dev steps. Stop and wash completely! Keep the bleach fresh (I make 300 mL and discard after 4 sheets). If you have bleached adequately, you don't need to restrain the second exposure. I am using bright bathroom lighting for 2 minutes.

Now the next step will be to make exposures in my Ansco 3A and get some postcard format pictures out that I can send to my analog photo friends. I might even try tank developing those and see what happens. If you are doing reversal processing, drop me a comment and let me know how it's going.

Sunday, July 23, 2017

Moving Forward in Reverse

If you read my article on lumen printing, this is sort of an addendum or appendix or epilogue or sequel. I had the paper cut, but for the lumen prints, I had cut it in sort of dim diffuse room light, so those pieces are really only good for lumen printing since they are a bit exposed already. So I went and cut some more 8x10 Agfa Multicontrast paper under my red led headlamp (hung about 30" above the work surface). Those pieces went directly into film holders. I had read about reversal processing film a while back (reversal processing is how slides or transparencies are made) and was sort of interested, but the bleach put me off. Most reversal process bleach is made with dichromate or permanganate compounds which are pretty toxic and best avoided if possible. So I shelved the idea of diy reversal. Then I read an interesting article about a fellow who made a working reversal bleach with just household hydrogen peroxide and lemon juice (the active ingredient there being citric acid). WHAT!? This I've got to try. I didn't have any film ready to develop, so why not try with the papers? It's more or less the same emulsion, just with a different base and in the case of RC paper like mine, a different top coat. What the heck, let's just experiment!. The article called for caffenol for the development steps, but I didn't have any of that ready to go. I did have some homemade my-tol(X-Tol knock-off), so I figured I'd just use that at stock concentration and see what happens. I read on APUG that you can develop paper with X-Tol stock for about 5 minutes, so that's where I started. Here is an overview of the process I used (note, I used 9g/L dry citric acid in place of lemon juice):

>
STEPTIME
1st developer (my-tol)5 min
Wash5 min
Bleach (cit. acid-hydrogen)11:30 min
Wash5 min
Re-exposure 300W at 1 meter2:30 min
2nd developer (my-tol)5 min
Wash5 min
Fixer5 min
Final Wash5 min
Wetting agent2

The first sheet I did with straight stock my-tol for 5 min in both development steps. Here it is. This is a straight color scan without any added colors, curves or contrast.

A couple of notes worth making here... I was tray developing under red light so I could see what was going on. After a couple of minutes in the first developer, the paper looked completely black. I couldn't see any image at all. I was a little worried, but I kept going because I knew that this was not necessarily an indication of failure yet. The bleach brought out a little bit of an image. I could just make out some light areas. Once I turned on the room lights for the re-exposure step, I could tell that the image was there still. It looked bad and was very low contrast. I thought, "well I guess I'll have to correct it in post." That's not what I was hoping for with this process, but sometimes that's all you get. But then I poured in the 2nd developer (same developer as I used in the first developer step) and there was the image, nice and crisp and contrasty in tan and deep black. That is when I got excited. The fixer didn't change the image since there really isn't any undeveloped silver left at this point.

The next set of exposures I did with 1:1 my-tol, thinking that I might lower the contrast a bit. Unfortunately, I was tray developing these together in an under-sized tray and so there are artifacts where the sheets contacted each other. But these are experiments, not art. What I was trying to see was whether the dilute developer would lower contrast. I don't think it did. Maybe more dilution or a different type of developer (vit. C based like caffenol or parodinal) would work. Maybe something as simple as preflashing the paper would work. These are all variables that can be explored.

So there you go. I think I really like this process. If anyone else has experience and wants to share some tips, please do!